Are you ready to elevate your nail game without stepping foot in a salon? If you’ve ever dreamed of achieving that flawless, professional manicure at home, you’re in the right place.
Applying nail tips with gel polish can transform your nails from ordinary to extraordinary, giving you that perfect, long-lasting finish. Imagine the confidence boost you’ll feel with those sleek, shiny tips that look like they were done by an expert.
But here’s the best part: you can do it all by yourself, saving both time and money. In this guide, you’ll discover the simple steps and insider tips to master this beauty trick, ensuring your nails look impeccable every time. Keep reading, and let’s unlock the secret to stunning nails together!
Choosing The Right Nail Tips
Nail tips are key to achieving a polished, professional manicure. Choosing the right ones ensures your nails look stunning and last longer. With various options available, it’s crucial to pick nail tips that suit your style and needs.
Types Of Nail Tips
There are several types of nail tips, each offering unique benefits. Acrylic nail tips are strong and durable. They provide a solid base for gel polish. Gel nail tips are lighter and more flexible. They blend seamlessly with your natural nails. Plastic nail tips are affordable and easy to apply. They come in various shapes and sizes. Each type enhances your manicure differently.
Size And Shape Considerations
Size matters when selecting nail tips. Choose tips that fit your nail bed snugly. Avoid tips that are too wide or too narrow. They can cause discomfort and affect the final look. Shape plays a critical role in the style of your nails. Oval tips offer a classic and elegant look. Square tips create a bold and modern appearance. Round tips provide a soft and natural feel. Select shapes that match your personal preference and occasion.
Preparation Essentials
Applying nail tips with gel polish starts with thorough preparation. This foundation ensures long-lasting and stunning results. Proper preparation prevents chipping and lifts. It sets the stage for flawless application.
Tools And Materials Needed
Gathering the right tools and materials is essential. You’ll need nail tips, gel polish, and a UV lamp. A nail file and buffer are also necessary. Use nail glue for attaching the tips securely. Don’t forget a cuticle pusher and cleanser. These items make the process smooth.
Prepping Your Natural Nails
Start by cleaning your nails thoroughly. Remove old polish and debris. Push back the cuticles gently. This step prevents polish from lifting. Buff the nail surface lightly. This creates a rough texture for better adhesion. Cleanse your nails to remove oils.
Trim and file your nails to desired length. Ensure they are even and smooth. This makes applying tips easier. Check for any damage or irregularities. Healthy nails ensure a perfect outcome. Proper preparation is the key to success.
Applying Nail Tips
Discover the art of applying nail tips with gel polish for a flawless manicure. Start by cleaning and prepping nails. Apply a base coat, attach nail tips, and seal with gel polish for a long-lasting finish.
Applying nail tips can enhance the length and look of your nails. This process requires precision and the right materials. With gel polish, you can achieve a smooth and professional finish. Let’s delve into the steps of applying nail tips effectively.
Adhesive Options
Choosing the right adhesive is crucial. Nail glue is a popular choice. It offers strong bonding. Brush-on glue is easier for beginners. It spreads evenly and prevents air bubbles. Gel adhesive is another option. It provides flexibility and strength. Select an adhesive that suits your comfort and skill level.
Positioning And Securing Tips
Start by selecting the right size for each nail. The tip should cover the nail’s edge without gaps. Apply a small amount of adhesive to the tip’s well area. Press the tip onto your natural nail. Hold it for a few seconds to ensure it sticks. Check alignment to avoid crooked placement. Secure the tip by pressing down gently. Make sure no air bubbles are trapped. Properly positioned tips ensure a natural look. They also provide a strong base for gel polish.
Shaping And Filing
Achieving perfect nails requires shaping and filing. This step is vital for a polished look. Proper technique ensures a long-lasting manicure. Let’s explore creating the desired shape and smoothing edges.
Creating Desired Shape
Choose your preferred nail shape first. Popular shapes include square, round, and almond. Each shape offers a unique style. Use a nail file to shape the tips. Hold the file at a slight angle. File in one direction to avoid splitting. Be gentle to maintain nail health. Check the symmetry of each nail. Adjust as needed for a balanced look.
Smoothing Edges
Rough edges can ruin your manicure. Use a buffer to smooth nail edges. Buffing creates a flawless finish. Move the buffer in gentle strokes. Focus on evenness and smoothness. Do not over-buff to prevent thinning. Examine nails for any remaining rough spots. Buff again if necessary for a perfect result.
Gel Polish Application
Nail tips with gel polish create a long-lasting, glossy finish. The application process requires patience and precision. Proper techniques ensure smooth results and enhance durability. Begin with clean nails and gather all necessary tools. This step-by-step guide will help you achieve salon-quality nails at home.
Base Coat Techniques
The base coat is crucial for a strong foundation. Apply a thin layer evenly on each nail. Ensure the entire nail surface is covered. This helps the gel polish adhere better and prevents chipping. Cure the base coat under a UV lamp for the recommended time. A proper base coat application sets the stage for a flawless finish.
Layering Gel Polish
Layering gel polish requires precision for a smooth look. Start with a thin coat of gel polish. Avoid applying too much at once to prevent unevenness. Cure each layer under the UV lamp. Repeat the process for a richer color. Typically, two to three layers achieve the desired shade and opacity. Finish with a top coat for added shine and protection.
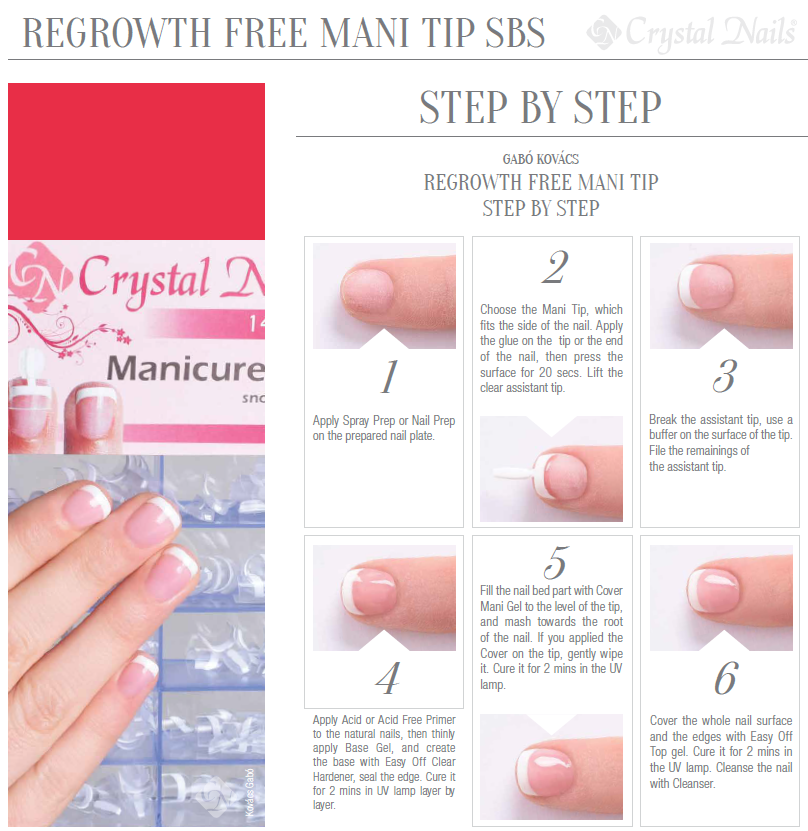
Credit: www.crystalnails.com
Curing And Sealing
After you’ve applied your nail tips and gel polish, the next crucial step is curing and sealing. This stage ensures the durability and shine of your manicure. Proper curing and sealing can make your manicure last longer and look salon-perfect. Let’s dive into the specifics of using UV or LED lamps and applying a top coat to seal your beautiful nails.
Using Uv Or Led Lamps
Curing your gel polish involves using a UV or LED lamp. These lamps help harden the gel polish, making it resistant to chips and cracks. If you’ve ever wondered why salon gel nails last for weeks, the secret lies in the curing process.
Choosing between a UV and LED lamp depends on your preference and budget. UV lamps are generally more affordable but take longer to cure the polish. LED lamps work faster and are often used in professional settings. Think about which one fits your needs.
Place your nails under the lamp after applying each coat. Make sure to follow the recommended curing time, usually 30-60 seconds for LED lamps and 2-3 minutes for UV lamps. A tip from my personal experience: avoid moving your hands during curing. It can cause uneven hardening and affect the polish’s longevity.
Top Coat Application
Applying a top coat is the final step to seal your gel polish. It adds an extra layer of protection and enhances the shine. Without it, your manicure might lose its luster quickly.
Use a high-quality top coat designed for gel polish. This ensures compatibility and better results. When applying, make sure to cover the entire nail surface, including the edges, to prevent peeling.
Allow the top coat to cure under the lamp as well. This seals everything in place, giving your nails that professional finish. Have you noticed how some manicures seem to glow? That’s the magic of a good top coat. It’s a simple step, but it makes a huge difference.
What do you think? Are you ready to give curing and sealing a try and transform your nail game?
Maintenance Tips
Maintaining your nail tips with gel polish is crucial for keeping them looking fabulous and fresh. Without proper care, your stunning nails could quickly become chipped and dull. So, how do you ensure they stay in tip-top shape? Here are some practical maintenance tips to help your gel nail tips last longer and avoid damage.
Avoiding Damage
Your nails are not invincible, even with gel polish. Everyday activities can cause wear and tear. Using your nails as tools to open cans or scrape off labels might seem harmless, but it’s a fast track to damage. Treat them with care and be mindful of what you’re using them for. When washing dishes or cleaning, consider wearing gloves. This simple act can protect your nails from harsh chemicals and excessive moisture.
Have you ever noticed how quickly your nails can chip when you type or text? Try to use the pads of your fingers instead of the tips. This small change can make a big difference in preserving your manicure. Pay attention to your daily habits that might be causing damage, and adjust accordingly. What habits can you change today to protect your nails?
Extending Wear
If you want your gel polish to last longer, there’s more to it than avoiding damage. Regular touch-ups can extend the life of your manicure. Applying a clear top coat every few days can keep your nails shiny and add an extra layer of protection. This is a quick and easy way to maintain your manicure without much fuss.
Think about how your nails interact with water. After a long soak in the bath, you might notice your nails feeling softer. Keep in mind that prolonged exposure to water can weaken the bond of your gel polish. Try to limit long swims and soak sessions to prevent your nails from lifting.
Have you considered the impact of your diet on nail health? Eating foods rich in vitamins and minerals can strengthen your nails from the inside out. Incorporate more biotin-rich foods, like eggs and nuts, into your meals. Strong nails mean longer-lasting manicures, so what will you add to your next grocery list?
By adopting these maintenance tips, you can enjoy beautiful gel nail tips that stand the test of time. Take a moment to assess your habits and see where small changes can make a big difference. Your nails will thank you!
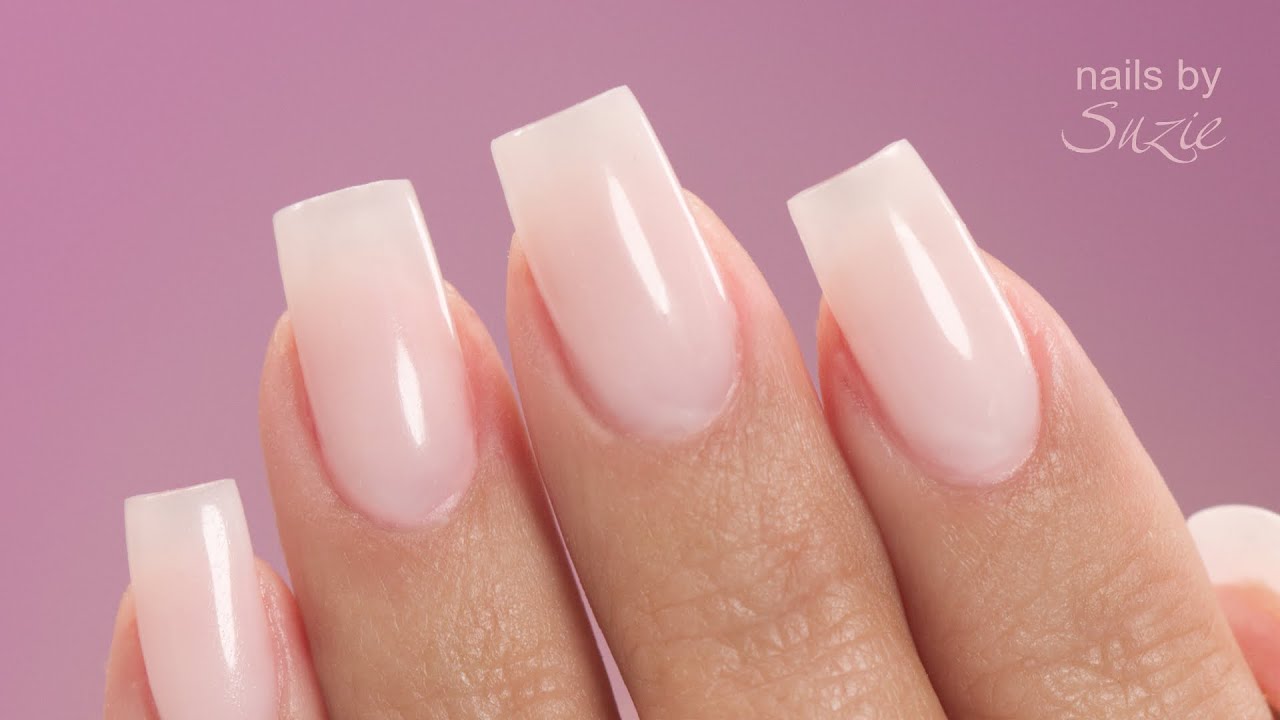
Credit: www.youtube.com
Troubleshooting Common Issues
Applying nail tips with gel polish can be tricky. Common issues include tips not sticking or polish bubbling. Ensure nails are clean and dry before application. Use a thin layer of gel for better adhesion. Proper curing under a UV lamp helps avoid bubbles and ensures a smooth finish.
Troubleshooting common issues with nail tips and gel polish can be daunting. Many encounter problems like lifted tips or chipped polish. These can ruin the perfect manicure look. But don’t worry. Solutions exist for these problems. With some guidance, you can fix these issues easily. Let’s explore how to deal with these challenges.
Fixing Lifted Tips
Lifted tips are a common problem. They often result from improper prep. Make sure the nail surface is clean and dry. Use alcohol wipes to remove oils. Apply a primer for better adhesion. Press the tips firmly. Ensure no air bubbles remain. Cure the gel polish properly under the lamp. This ensures a strong bond. If lifting occurs, file down the edges. Reapply gel polish to seal the tip.
Handling Chipped Polish
Chipped polish can be frustrating. It often happens due to weak nails. Strengthen nails with a base coat. Apply thin layers of gel polish. This helps prevent chipping. Avoid using nails as tools. This reduces the risk of chips. If chipping occurs, gently buff the area. Apply a thin layer of gel polish. Seal it with a top coat. Cure it under the lamp for durability. Regular maintenance can help keep your nails chip-free.

Credit: scarlettnailsupplies.com
Frequently Asked Questions
How Do I Prepare Nails For Gel Tips?
Start by cleaning your nails thoroughly. Remove any old polish and lightly buff the nail surface. Push back cuticles gently, ensuring a smooth base. Applying a base coat helps gel tips adhere better. Proper preparation ensures longer-lasting results and prevents lifting.
Can Gel Polish Damage Natural Nails?
Gel polish itself doesn’t damage nails, but improper removal can. Avoid peeling off gel polish, which can strip nail layers. Instead, use acetone and follow removal instructions carefully. Regular breaks between applications help maintain nail health. Proper care minimizes potential damage.
How Long Do Gel Tips Last?
Gel tips typically last around 2 to 3 weeks. Longevity depends on nail care and lifestyle factors. Regular touch-ups and proper maintenance can extend their lifespan. Avoid harsh chemicals and excessive pressure to keep them looking fresh longer. Choose quality products for best results.
What Tools Are Needed For Applying Nail Tips?
You’ll need a nail file, buffer, cuticle pusher, and nail glue. Additionally, have gel polish, UV/LED lamp, and top coat ready. These tools ensure a smooth application process. Prepare a clean workspace to keep tools organized. Proper tools ensure professional-looking results.
Conclusion
Applying nail tips with gel polish can be fun and easy. You can achieve salon-quality nails at home. Start by prepping your nails properly. Apply the tips carefully. Use gel polish in thin layers for a smooth finish. Cure under a lamp for durability.
Always file and shape for a polished look. With practice, you’ll get better each time. Don’t rush the process. Enjoy the creativity of designing your nails. You’ll love the results. Try different colors and designs. It’s all about expressing yourself.
Have fun creating beautiful nails!
Amazon and the Amazon logo are trademarks of Amazon.com, Inc, or its affiliates.