Imagine this: You’re ready for a fresh look, but your gel nail polish just won’t budge. We’ve all been there, staring at our nails, wondering how to safely and effectively remove that stubborn polish.
You’re not alone in this! Many have faced the same challenge, and that’s why you’re here, ready to discover the easiest way to get those nails looking fabulous again. In this guide, you’ll find simple, step-by-step instructions that will help you remove gel nail polish without damaging your nails or breaking the bank.
Curious to learn the secret to perfectly clean nails at home? Keep reading, because we’ve got the tips and tricks that will make you a pro in no time.

Credit: www.houseofnails.co.nz
Essential Tools
Removing gel nail polish at home can feel challenging. But with the right tools, you can do it easily. Having the proper items at your disposal not only saves time but also protects your nails from damage. Let’s explore the essential tools you need for a safe and effective gel polish removal.
1. Nail File
A good nail fileis key. It helps to gently buff the shiny top layer of the gel polish. This step allows the remover to penetrate better, making the process smoother. Choose a medium grit file for the best results.
2. Acetone
Acetoneis crucial for breaking down the gel polish. Use pure acetone for the best results. Avoid nail polish removers that contain added oils or fragrances, as they may slow down the removal process.
3. Cotton Balls Or Pads
Cotton balls or pads work well to hold the acetone against the nail. Soak them in acetone and place them on your nails. They help in loosening the gel polish for easy removal.
4. Aluminum Foil
Aluminum foilkeeps the cotton in place. Tear small pieces and wrap them around your fingertips. This step ensures the acetone stays in contact with the gel polish.
5. Orangewood Stick Or Cuticle Pusher
An orangewood stickor cuticle pusher gently lifts the softened gel polish from your nails. Be gentle to avoid damaging your natural nails.
6. Nail Buffer
Once the gel is removed, a nail buffersmooths the nail surface. It helps in removing any remaining polish and gives your nails a nice, even finish.
7. Moisturizer Or Cuticle Oil
After removal, your nails may feel dry. Apply a good moisturizeror cuticle oil to nourish and hydrate your nails and skin.
| Tool | Purpose |
|---|---|
| Nail File | Buffs the top layer |
| Acetone | Breaks down gel polish |
| Cotton Balls/Pads | Holds acetone to nails |
| Aluminum Foil | Keeps cotton in place |
| Orangewood Stick | Removes softened gel |
| Nail Buffer | Smooths nail surface |
| Moisturizer/Cuticle Oil | Hydrates nails and skin |

Credit: www.amazon.com
Preparation Steps
Removing gel nail polish might seem challenging, but following proper preparation steps can make the process smooth and safe. The key to a successful gel polish removal lies in gathering the right supplies and protecting your workspace. These steps not only preserve the integrity of your nails but also ensure a mess-free removal experience.
Gather Supplies
Before starting the gel polish removal process, it is crucial to gather all necessary supplies. Having everything on hand will save time and make the procedure more efficient. Here’s what you need:
- Acetone:Essential for the soak-off method, acetone is effective in breaking down the gel polish.
- Cotton Balls:Use them to apply acetone directly onto the gel nails.
- Nail File:Helpful for buffing and breaking the top layer of the gel polish.
- Foil Wraps:These can be used to secure cotton balls soaked in acetone on your nails.
- Nail Care Products:Keep nail oil or moisturizer handy to maintain nail health post-removal.
Organize these supplies on a table for easy access. Using a table can help:
| Item | Purpose |
|---|---|
| Acetone | Break down gel polish |
| Cotton Balls | Apply acetone |
| Nail File | Buffing gel nails |
| Foil Wraps | Secure soaked cotton balls |
| Nail Care Products | Promote nail health |
Protect Your Workspace
Protecting your workspace is crucial during gel polish removal. This ensures a clean environment and prevents damage to surfaces. Follow these steps:
- Cover Surfaces:Use old towels or plastic sheets to cover your table and protect it from acetone spills.
- Ventilation:Ensure the room is well-ventilated, as acetone can produce strong fumes. Open windows or use a fan.
- Lighting:Good lighting helps you see the gel nails clearly, aiding in careful removal.
- Nearby Trash Bin:Keep a trash bin close for easy disposal of used cotton balls and foil wraps.
Creating a safe and organized workspace not only helps in a clean removal but also supports nail health and manicure maintenance. Preventing acetone from staining surfaces or getting on clothes is essential. Prioritize safety and cleanliness throughout the gel polish removal process.
Soaking Process
Gel nail polish offers a glossy and long-lasting finish that many love. But removing it can be tricky. The soaking process is a popular method to safely remove gel polish without damaging your nails. It involves using acetone and patience to break down the gel layers. Let’s dive into the details of this process to ensure you remove your gel polish effectively.
Choosing The Right Acetone
Acetone is the key ingredient for breaking down gel polish. But not all acetone is created equal. Choosing the right type makes a difference in the soaking process. Here’s what you need to know:
- Pure Acetone:This is the most effective option. It dissolves the gel polish faster. Check the label to ensure it’s 100% acetone.
- Nail Polish Remover with Acetone:Some removers contain acetone but are diluted. These can work but take longer.
- Moisturizing Acetone:This type includes added oils or vitamins. It helps keep nails hydrated.
Here’s a quick comparison table:
| Type | Effectiveness | Benefits |
|---|---|---|
| Pure Acetone | High | Fast removal |
| Nail Polish Remover with Acetone | Moderate | Gentler on nails |
| Moisturizing Acetone | High | Nourishing |
Always choose a type that balances speed and nail care. If your nails are weak, consider moisturizing acetone.
Soaking Techniques
Once you’ve selected your acetone, it’s time to start soaking. Here are two popular techniques:
- Foil Wrap Method:
- Gather materials: cotton balls, aluminum foil, acetone.
- Soak cotton balls in acetone.
- Place soaked cotton on nails.
- Wrap each fingertip with foil to secure the cotton.
- Wait for 10-15 minutes before checking.
- Bowl Method:
- Fill a bowl with acetone.
- Soak fingertips directly in the bowl.
- Ensure nails are fully submerged.
- Check after 10-15 minutes.
Both methods work well, but the foil wrap method uses less acetone. Choose a technique based on your preference. Always check the polish after soaking; it should peel off easily. If not, soak for a few more minutes.
Remember to moisturize your nails after the process. Acetone can dry them out.
Removal Methods
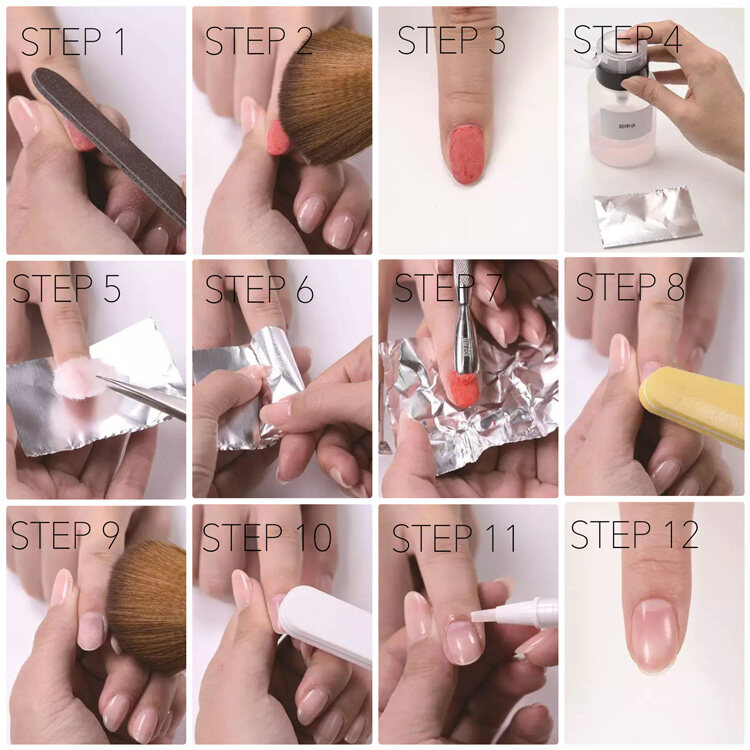
Gel nail polish offers a glossy and durable finish, but its removal can be tricky. Knowing the right removal methodscan save your nails from damage. Here, we explore two popular techniques: the Foil Method and the Cotton Ball Method. Both are effective and easy to follow at home.
Foil Method
The Foil Methodis a popular choice for removing gel nail polish. It involves wrapping each nail in aluminum foil with acetone-soaked cotton. This method traps heat and helps the acetone break down the gel polish efficiently.
Here’s a step-by-step guide:
- File the top layerof your gel polish gently. This helps the acetone penetrate the polish.
- Soak a small piece of cotton in acetone.
- Place the soaked cotton on your nail.
- Wrap each finger with a piece of aluminum foil.
- Leave the foil wraps on for about 15-20 minutes.
- Remove the foil and cotton. Use a wooden cuticle stick to gently push off the gel polish.
Tip: Ensure the foil is snug to keep the acetone in contact with the polish.
In case of any residue, repeat the process or buff lightly with a nail buffer.
Cotton Ball Method
The Cotton Ball Methodis another efficient way to remove gel polish. This method requires a bit more attention, but it’s equally effective.
Steps to follow:
- Lightly buff the surfaceof your gel nails with a nail file.
- Soak cotton balls in acetone.
- Place a soaked cotton ball on each nail.
- Secure the cotton balls with small pieces of plastic wrap or nail clips.
- Let them sit for 20 minutesto allow the acetone to dissolve the gel.
- Gently remove the cotton balls. Use a cuticle pusher to lift the gel polish off.
If needed, use a nail buffer to smooth out any remaining gel residue.
Safety Tip: Always moisturize your nails and cuticles after removing gel polish. Acetone can dry out your nails.
Post-removal Care
After successfully removing gel nail polish, the next step is to focus on post-removal care. Proper care ensures that your nails stay healthy and strong. This includes maintaining your nails and giving them the hydration they need. Let’s dive into the essential steps for keeping your nails in top condition.
Nail Maintenance
Proper nail maintenance is crucial once the gel polish is off. This keeps your nails looking their best and prevents damage.
Here are some simple steps to follow:
- Trim and Shape:Use a nail clipper to trim your nails to a manageable length. Shape them gently with a nail file. Always file in one direction to prevent splitting.
- Buff the Surface:A gentle buffing smooths out any rough spots. Be careful not to over-buff, as this can thin your nails.
- Apply a Strengthener:Consider using a nail strengthener. This reinforces weak nails and reduces breakage.
- Inspect for Damage:Check for any signs of damage or splitting. Address these issues promptly to prevent further problems.
Here’s a quick table summarizing the main steps:
| Step | Action |
|---|---|
| Trim and Shape | Use clippers and a nail file |
| Buff | Gently smooth nail surface |
| Strengthen | Apply a nail strengthener |
| Inspect | Look for signs of damage |
Hydrating Treatments
Hydration is key to keeping nails healthy. Without moisture, nails can become brittle and weak.
Consider these hydrating treatments:
- Nail Oils:Use cuticle oil regularly. This keeps the nail bed nourished and prevents dryness. Good oils include jojoba, almond, and vitamin E.
- Hand Cream:Apply a rich hand cream daily. This locks in moisture and protects both nails and hands.
- Soaking Ritual:Soak your nails in warm water mixed with a few drops of oil. This softens the cuticles and hydrates the nails.
- Stay Hydrated:Drink plenty of water. Hydration from the inside out is just as important as topical treatments.
By following these simple yet effective care steps, you can maintain strong, healthy nails even after gel polish removal. Regular maintenance and hydration are your best allies in nail care.
How Do You Remove Gel Nail Polish At Home?
Gel nail polish offers a long-lasting and glossy finish, making it a popular choice for many. But when it’s time to remove it, the process can seem daunting. Learning how to remove gel nail polish at home can save you time and money. With a few simple tools and techniques, you can safely and effectively get rid of your gel polish without damaging your nails.
How Do I Get My Nails Back To Normal After Gel?
Restoring nails after gel polish requires patience and proper care. Gel polish can sometimes leave nails feeling weak or dry. Here are some effective steps to help get your nails back to normal:
- Moisturize Regularly:Use a nourishing hand and nail cream. Apply it daily to keep your nails and cuticles hydrated.
- Use Nail Strengtheners:Consider applying a nail hardener or strengthener. This can help reinforce weak nails.
- Eat a Balanced Diet:A diet rich in vitamins and minerals supports healthy nail growth. Foods like eggs, nuts, and leafy greens are beneficial.
- Avoid Harsh Chemicals:Limit your nails’ exposure to harsh cleaning agents. Wear gloves when cleaning.
For those wanting a structured plan, here’s a simple table to track your nail care routine:
| Action | Frequency |
|---|---|
| Moisturize | Daily |
| Apply Strengthener | Every 2-3 Days |
| Healthy Diet | Consistently |
| Wear Gloves | During Cleaning |
How Long Does It Take To Soak Off Gel Nails?
Understanding the gel nails soaking process is crucial for effective removal. The time it takes to soak off gel nails can vary based on the thickness of the gel and the type used. Generally, the process takes around 15 to 30 minutes.
Here are factors that affect the soaking time:
- Gel Thickness:Thicker layers may take longer to dissolve.
- Type of Gel:Some gels are formulated for quick removal, while others are more stubborn.
- Acetone Concentration:A higher concentration of acetone for gel polish can speed up the process.
To ensure the best results, follow these steps:
- File the Surface:Gently file the top layer to break the seal.
- Use Cotton Balls:Soak them in acetone and place on each nail.
- Wrap in Foil:Secure the cotton with foil to keep the acetone from evaporating.
Removing Gel Polish At Home: Easy Steps & Tips
Diy gel nail removal at home is straightforward with the right approach. Here are the best methods to remove gel nails safely:
- Gather Your Supplies:You need acetone, cotton balls, aluminum foil, a nail file, and a cuticle stick.
- File the Top Layer:Lightly file the surface of the gel polish. This helps the acetone penetrate better.
- Soak Cotton Balls:Dip them in acetone for gel polish, ensuring they are well-saturated.
- Wrap Nails:Place the soaked cotton on your nails and wrap each finger in foil. This traps the heat and speeds up the gel polish removal.
- Wait and Check:Let your nails soak for 15-20 minutes. Check if the gel lifts easily. If not, give it a few more minutes.
- Gently Remove Residue:Use a cuticle stick to gently push off any remaining polish.
Here are some gel polish removal tips to keep in mind:
- Be Patient:Rushing can damage your nails.
- Moisturize After:Apply cuticle oil or cream to restore moisture.
- Try Home Remedies:If you prefer natural methods, soaking nails in warm water with a bit of vinegar can be an alternative.
Credit: www.missgel.com
Frequently Asked Questions
What Are The Steps To Remove Gel Nail Polish?
Start by filing the top layer of the gel polish gently. Soak cotton balls in acetone and place them on each nail. Wrap nails with foil and wait for 10-15 minutes. Remove the foil and cotton, then gently scrape off the softened gel polish using a cuticle pusher.
Can You Remove Gel Polish Without Acetone?
Yes, you can use a soak-off gel polish remover. It typically contains less harsh ingredients compared to pure acetone. Apply the remover to a cotton ball and wrap it around the nail with foil. Wait for the recommended time on the product label, then gently scrape off the polish.
How Long Does It Take To Remove Gel Polish?
Removing gel polish usually takes around 20-30 minutes. This includes filing the top layer, soaking nails in acetone or remover, and scraping off the softened polish. Be patient during the process to avoid damaging your natural nails and ensure a clean removal.
Is It Safe To Peel Off Gel Nail Polish?
No, peeling off gel nail polish is not recommended. It can damage the top layers of your natural nails, making them weak and prone to breakage. Always use the proper removal process, including filing and soaking, to protect your nails and maintain their health.
Conclusion
Removing gel nail polish doesn’t have to be tricky. With the right tools, it’s simple. Start by soaking your nails in acetone. Use a cotton ball and foil wrap for best results. Then, gently scrape off the softened polish. Be careful to avoid damaging your nails.
Moisturize your hands and nails afterwards. This keeps them healthy. Regular practice makes the process easier. Your nails will stay strong and ready for a new look. Remember, patience and care are key. Enjoy changing your style with ease!
Amazon and the Amazon logo are trademarks of Amazon.com, Inc, or its affiliates.