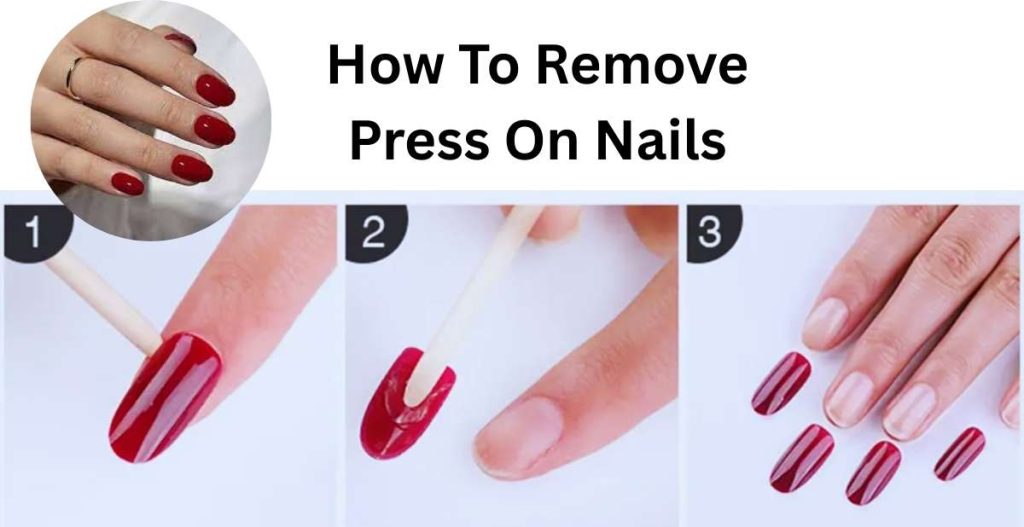
Soak, lift gently, use remover, moisturize—never rip off press-ons; remove safely at home.
You popped on a pretty set for the weekend, but now they will not budge. You try to pry, but that sharp tug says “stop.” I have been there. The good news? You do not need a salon or harsh chemicals to figure out how to remove press on nails the right way. With the right remover and a calm, step-by-step approach, your nails will slide off cleanly. Your natural nails will stay healthy and smooth. Below, I break down safe methods and review the best removers that actually work at home—quickly, gently, and with less mess.
Glamnetic Press-On Nail Remover, 30 ml

Glamnetic’s non-acetone remover is designed to melt press-on adhesive without the harsh smell. The serum texture clings to nail edges and seeps under tips fast. If you need to learn how to remove press on nails without damage, this formula is a soft landing. It is gentle on natural nails and cuticles and helps avoid that dreaded peeling.
I like how the serum does not run all over the place. The odorless claim holds up in daily use. It loosens glue in minutes, so I spend less time prying. The small bottle travels well for trips or quick changes between sets.
Pros:
- Odorless and non-acetone for low irritation
- Serum texture stays put and penetrates glue
- Great for sensitive skin and thin nails
- Works quickly with minimal scraping
- Small, travel-friendly bottle
- Reduces risk of lifting natural nail layers
Cons:
- 30 ml can run out fast with frequent use
- May need a second application for thicker glues
- No included tools in the box
My Recommendation
Choose Glamnetic if you want a gentle, clean way to learn how to remove press on nails at home. It is ideal if you are sensitive to acetone or strong smells. The serum is neat, fast, and kind to your nail plate. If you wear press-ons often, this helps keep your nail beds smooth and strong over time.
I suggest pairing it with a wood stick and a soft cuticle pusher. Apply serum, wait a minute, then lift the side walls slowly. Reapply as needed. Finish with cuticle oil. Your nails will thank you.
| Best for | Why |
|---|---|
| Sensitive nails and skin | Odorless, non-acetone, low irritation |
| Quick, mess-free removal | Serum texture clings and penetrates fast |
| Frequent press-on users | Protects the nail plate during repeat use |
Beetles Nail Glue Remover + Cuticle Tool, 20 ml

Beetles pairs a non-acetone glue remover with a cuticle tool, so you have what you need in one buy. The remover targets traditional press-on nail glue and sticky tabs. It is not for UV-cured gel glue, so keep that in mind. Still, for standard press-ons, it breaks down adhesive well.
The included tool helps lift edges safely. I apply a small bead at the sidewall and let it sit. Then I glide the tool under the tip, add more remover, and continue. If you are learning how to remove press on nails for the first time, this simple kit makes it easy.
Pros:
- Comes with a handy cuticle tool
- Non-acetone and gentle on nails
- Targets glue and sticky tabs
- Easy to apply with controlled flow
- Compact size for travel
- Good value as a starter kit
Cons:
- Not for UV gel glue removal
- 20 ml bottle can be small for heavy users
- May take longer on thick glue layers
My Recommendation
Pick Beetles if you want a basic, affordable kit that works for common press-on glues. It is a friendly way to master how to remove press on nails without a salon. The tool adds control, which helps prevent tearing or gouging. If you rotate sets weekly, this will serve you well.
Use it with patience. Add remover, wait for a minute, and nudge gently. Reapply and repeat. Wash hands after and seal in moisture with a good oil or cream.
| Best for | Why |
|---|---|
| Beginners | All-in-one remover plus tool for control |
| Budget-minded users | Affordable kit with solid performance |
| Standard glue and tabs | Formulated for press-on adhesive breakdown |
Modelones Press-On Nail Glue Remover, 50 ml

Modelones offers a larger 50 ml bottle and a wood stick for lifting. The clear formula helps you see exactly where it spreads. If you are figuring out how to remove press on nails in fewer steps, the extra volume means you can be generous. It works well on layered glue and thicker tips.
The wood stick is gentle along the sidewalls. It helps you avoid scratching the natural nail. I apply remover, wait a minute, and rotate the stick with light pressure. When the tip gives, I stop and add more remover to let it do the work.
Pros:
- Large 50 ml bottle lasts longer
- Clear formula for precise application
- Includes a wood stick for safe lifting
- Effective on thicker glue layers
- Good for frequent set changes
- Gentle on nails with slow, steady use
Cons:
- May still require a few rounds on stubborn glue
- Cap needs to be closed tightly to avoid evaporation
- No strong scent, but not fully odorless
My Recommendation
Choose Modelones if you go through many sets or share with a friend. It simplifies how to remove press on nails because you will not run out mid-removal. The included stick keeps you from using metal tools that can be too harsh. It balances cost and capacity well.
Use it as a system. Apply, wait, lift a little, and reapply. Work side to center on each nail. Finish with a wash and a light buff if needed. Your nail plate will look neat and feel smooth.
| Best for | Why |
|---|---|
| Frequent press-on wearers | 50 ml size supports repeated use |
| Thick glue or layered tips | Formula loosens tougher adhesive |
| Gentle removal plans | Wood stick reduces nail plate scrape |
Curvlife Pinpoint Glue Remover, 20 ml

Curvlife is all about accuracy. The pinpoint tip helps you place remover right where the glue sits. That precision speeds up the process and reduces waste. If you want to master how to remove press on nails with the least mess, this tool-like bottle is a nice touch.
It is non-acetone and gentle on skin. I like it for lifting the edges near the cuticle line. A narrow bead along the side seams loosens the seal quickly. Reapply as needed and slide off with minimal effort.
Pros:
- Pinpoint applicator for precise placement
- Non-acetone and gentle
- Great for sidewall and cuticle-adjacent areas
- Reduces product waste
- Helps avoid over-saturation
- Solid pick for quick changes
Cons:
- 20 ml size may run out quickly
- Very thick glue still needs patience
- No extra tools included
My Recommendation
Get Curvlife if you value control and neat work. It is perfect if you hate drips and want a surgical approach to how to remove press on nails. The precise tip reduces the risk of over-softening surrounding skin. It also helps save product.
Make it part of a routine. Apply at edges, wait, lift slightly, and reapply. Keep a tissue handy to catch any extra. Follow with cuticle oil after washing hands. Your nails will feel clean and calm.
| Best for | Why |
|---|---|
| Precision lovers | Pinpoint applicator targets glue lines |
| Quick swaps | Fast loosening with minimal mess |
| Small nail beds | Controlled flow prevents overspill |
Luckyfairy Press-On Glue Remover, 30 ml

Luckyfairy’s non-acetone remover targets press-on glue and tips. It markets quick and easy removal, and it does deliver on speed with standard glues. Note that it is not for gel polish breakdown. But for press-on adhesive, it loosens bonds without harsh fumes.
I find it helpful on newer sets within a few days of wear. It seeps into seams and lifts cleanly. If you are building a kit to learn how to remove press on nails the safe way, Luckyfairy fits well. The 30 ml size balances value and portability.
Pros:
- Non-acetone and gentle on nails
- Good speed on common glues
- Easy to apply with controlled flow
- Nice balance of size and price
- Low odor compared to acetone
- Solid for early removal within days
Cons:
- Not for gel polish removal
- Older sets may need more time
- No included tools
My Recommendation
Choose Luckyfairy if you swap sets often and want a quick, gentle remover. It gives you control while you learn how to remove press on nails without tearing your natural nail plate. It is also a good size for travel or a purse kit.
Use it with warm water pre-soak if the glue is stubborn. Apply at the edges, wait, and nudge slowly. Add more as the bond softens. Finish with nourishing oil to keep nails flexible.
| Best for | Why |
|---|---|
| Frequent style changers | Quick action on standard glues |
| On-the-go kits | 30 ml bottle is portable |
| Gentle removal | Non-acetone formula with low odor |
FAQs Of how to remove press on nails
How do I remove press-on nails without damaging my natural nails?
Use a non-acetone remover or soak in warm soapy water first. Apply remover at edges. Wait a minute. Lift gently with a wood stick. Reapply and repeat. Moisturize after.
Can I use acetone to remove press-ons?
Yes, acetone works fast on many glues. But it can dry nails and skin. If you use it, keep contact short. Rinse, then oil your cuticles.
What if my press-ons were applied with UV gel glue?
Non-acetone removers may not work. You may need acetone soak-off. Break the seal, soak cotton in acetone, wrap with foil, and wait. Check every few minutes.
How long should removal take?
Most sets loosen in 5–15 minutes with the right remover. Older sets can take longer. Be patient. Do not pry or force a stubborn nail.
What should I do after removal?
Wash, dry, and apply cuticle oil. Buff lightly only if needed. Let nails rest for a day before a new set if they feel tender.
Final Verdict: Which Should You Buy?
If you want the gentlest path, pick Glamnetic. If you need a tool included, Beetles is a smart starter. For heavy use, Modelones offers the most product and steady performance.
Curvlife shines for precision, while Luckyfairy balances speed and size. Any of these will help you learn how to remove press on nails cleanly at home.
How to remove press on nails, the complete guide: My expert tips
Removing press-ons is simple if you respect the bond. Glue is strong, but it softens with the right solvent and time. You will get the best results if you make the remover do the work. Your job is to guide and wait, not pry and force.
Here is how to remove press on nails like a pro:
- Clip length if nails are extra long to reduce leverage and torque.
- File the free edge lightly to open a path for remover at the sidewalls.
- Optional: Soak fingertips in warm soapy water for 5 minutes to start loosening.
- Dry hands and apply your remover at the cuticle line and side seams.
- Wait 60–90 seconds. Gently wiggle the side with a wood stick or soft tool.
- Reapply remover to any sticky area and wait again. Do not rush.
- Continue edge by edge until the tip slides off without pain.
- Wash, dry, and moisturize with cuticle oil and hand cream.
Important notes that keep nails safe when you are learning how to remove press on nails:
- Never rip off a press-on. That can peel layers of your nail plate.
- Do not saw or dig with metal tools. Gentle pressure is key.
- If it hurts, stop and add more remover. Pain means the bond is not ready.
- Take your time. Short, repeated applications work better than one big pull.
- Keep nails hydrated daily. Soft, flexible nails resist peeling.
What makes a good remover for your routine?
- Non-acetone blends are kinder to skin and cuticles.
- Serum or gel textures control where the product goes.
- Clear formulas help you see the bond and progress.
- Precise tips save product and prevent skin over-saturation.
- Low-odor products make removal more pleasant.
When should you consider acetone?
If the press-ons were bonded with a very strong glue or a UV-cured gel, acetone may be needed. Acetone breaks down cyanoacrylate bonds faster than non-acetone options. Limit skin contact, moisturize after, and give nails a rest day if they feel dry. If you have acrylic overlays under press-ons, test on one nail first. Some overlays soften with acetone, so work with care and keep contact brief.
How to remove press on nails quietly and discreetly at work or travel:
- Pack a small remover, wood stick, tissues, and a tiny oil bottle.
- Pick a low-odor formula like Glamnetic or Luckyfairy.
- Apply a tiny bead to edges, wait a minute, and slide off gently.
- Clean hands and oil. You can do this in a few minutes.
How often can you wear press-ons back to back?
You can wear them often if you remove them correctly and keep your nail plate healthy. Hydrate daily and take a rest day if nails feel tender. File lightly in one direction only, and avoid harsh scraping. If you follow proper steps for how to remove press on nails, your natural nails can stay strong and smooth over time.
Nail health recovery after removal:
- Use cuticle oil 2–3 times per day for a week.
- Apply a light nail strengthener if you see peeling layers.
- Wear gloves when doing dishes to avoid over-drying.
- Keep nails short while they recover from heavy wear.
What to avoid during removal:
- Do not twist or yank. That causes micro-tears.
- Do not mix removers with heat or open flame. Many removers are flammable.
- Do not apply remover on broken skin. Let skin heal first.
- Do not reuse press-ons if they are cracked or warped. That can scratch nails.
The beginner’s checklist for how to remove press on nails:
- Remover (non-acetone or acetone, based on your glue)
- Wood stick or gentle cuticle pusher
- Fine file (180–240 grit) for edge prep
- Warm water and mild soap for pre-soak (optional)
- Cuticle oil and hand cream for aftercare
- Tissues or cotton pads to catch excess product
Habit tips that save your nail plate in the long run:
- Switch to sticky tabs if you only need a one-day look.
- Use a thin layer of glue to reduce removal time later.
- Do not wear a single set longer than 10–14 days.
- Keep nails clean and dry to prevent lift and trapped moisture.
A quick word on glue types and removal expectations:
Most press-on kits use cyanoacrylate-based glues. Non-acetone removers with esters or carbonates can soften them with time. For UV-cured gel glues, an acetone soak may be necessary. Work in short cycles. Check the bond every few minutes. You will learn how to remove press on nails faster with practice, and you will feel when the nail is ready to slide off.
Why patience beats force every time:
Your nail plate is made of layers. Force can peel layers and cause ridges or thin spots. Let chemistry do the heavy lifting. Remover plus time equals clean release. That is the core of how to remove press on nails the healthy way.
Final care routine I love after removal:
- Wash and pat dry.
- Massage cuticle oil into nail and sidewalls for 30 seconds each.
- Seal with a rich hand cream.
- Before bed, repeat oil for extra hydration.
When to see a pro:
If a nail is very painful to remove, stop and get help. If you notice green, white, or black spots under a nail, that could be moisture or a nail issue. Let a pro check it. Your nail health comes first, and learning how to remove press on nails includes knowing when to pause.
Quick troubleshooting guide:
- Nail will not budge after 5 minutes: Reapply remover and wait 2–3 more minutes.
- Glue remains on nail plate: Buff very lightly with a fine buffer; oil after.
- Skin feels dry: Switch to a gentler, non-acetone remover next time and oil more.
- Edges tear: Lift from sidewalls slowly; do not start from the free edge.
A final reminder on how to remove press on nails:
Slow is smooth, and smooth is fast. Small, steady steps beat rushing every time. If you build the right routine and use the right remover, your nails will stay happy and ready for the next set.
Amazon and the Amazon logo are trademarks of Amazon.com, Inc, or its affiliates.