Removing acrylic nails can be a bit of a challenge, especially if you want to protect your natural nails underneath. You’ve likely admired the beauty and durability that acrylics provide, but now it’s time to say goodbye.
Are you worried about damaging your nails or spending too much time and money at the salon? Fear not, because you can safely and effectively remove those acrylics right at home. Imagine the satisfaction of gently unveiling your natural nails, healthy and ready to shine.
This guide is crafted just for you, to help you achieve a flawless removal process without the stress. Ready to discover the secrets to a damage-free nail transformation? Keep reading to learn the step-by-step process that will leave your nails feeling fresh and fabulous.
Preparation Steps
Removing acrylic nails at home can be a simple process. It requires the right preparation steps. Proper preparation ensures a smooth and safe removal. This reduces damage to your natural nails. Follow these steps for the best results.
Gather Necessary Tools
Before you start, gather all the tools you need. This makes the process smoother. Here’s a list of items you’ll need:
- Acetone:Use pure acetone for effective removal.
- Nail Clippers:Trim your acrylic nails down.
- Nail File:A coarse file is best for tough acrylic.
- Buffer:Smooth out the surface after filing.
- Cuticle Pusher:Gently lift the edges of the acrylic.
- Foil Wraps or Cotton Balls:Soak in acetone and wrap around nails.
- Bowl:Use a glass bowl for soaking nails in acetone.
- Moisturizer or Cuticle Oil:Rehydrate nails and skin after removal.
Organizing your tools in advance saves time. It also reduces stress during the process. Here’s a quick table for reference:
| Tool | Purpose |
|---|---|
| Acetone | Dissolves acrylic |
| Nail Clippers | Trim nails |
| Nail File | File down acrylic surface |
| Buffer | Smooth nails |
| Cuticle Pusher | Lift acrylic edges |
| Foil Wraps/Cotton Balls | Soak nails in acetone |
| Bowl | Soaking nails |
| Moisturizer/Cuticle Oil | Hydrate nails and skin |
Having these tools within reach makes the removal process efficient and less messy.
Choose A Suitable Workspace
Selecting the right workspace is crucial. An ideal workspace is clean and well-lit. This helps you see what you’re doing clearly. Here are some tips for setting up your workspace:
- Location:Choose a flat surface like a table or desk.
- Protection:Cover the area with a towel or cloth. Acetone can damage surfaces.
- Ventilation:Ensure good airflow. Acetone fumes can be strong.
- Lighting:Use bright light. It helps you see the nails clearly.
- Comfort:Sit in a comfortable chair. You might be there for a while.
Make sure you have everything within reach. This includes your tools and any other items you might need. Organizing your space helps you focus on the task. It also makes the process safer.
A suitable workspace ensures you work efficiently and comfortably. It minimizes distractions and potential spills. This step is as important as gathering the right tools.
Soaking Method
Acrylic nails can enhance your beauty, but removing them may seem daunting. The soaking method is a popular way to gently remove acrylic nails without damaging your natural nails. This process involves soaking your nails in a solution to loosen the acrylic, making it easier to remove. It’s a safe and effective technique, ideal for those who prefer to handle their nail care at home.
Using Acetone
The most common method for soaking off acrylicsis using acetone. Acetone is a powerful solvent that breaks down acrylic nails efficiently. It’s crucial to follow the steps carefully to ensure gentle nail careand avoid damaging your nails.
Begin by gathering necessary materials:
- Pure acetone
- Aluminum foil
- Cotton balls
- Nail file <li</li
Follow these steps for acrylic nail removal:
- File the acrylic nails to remove the top layer.
- Soak cotton balls in acetone.
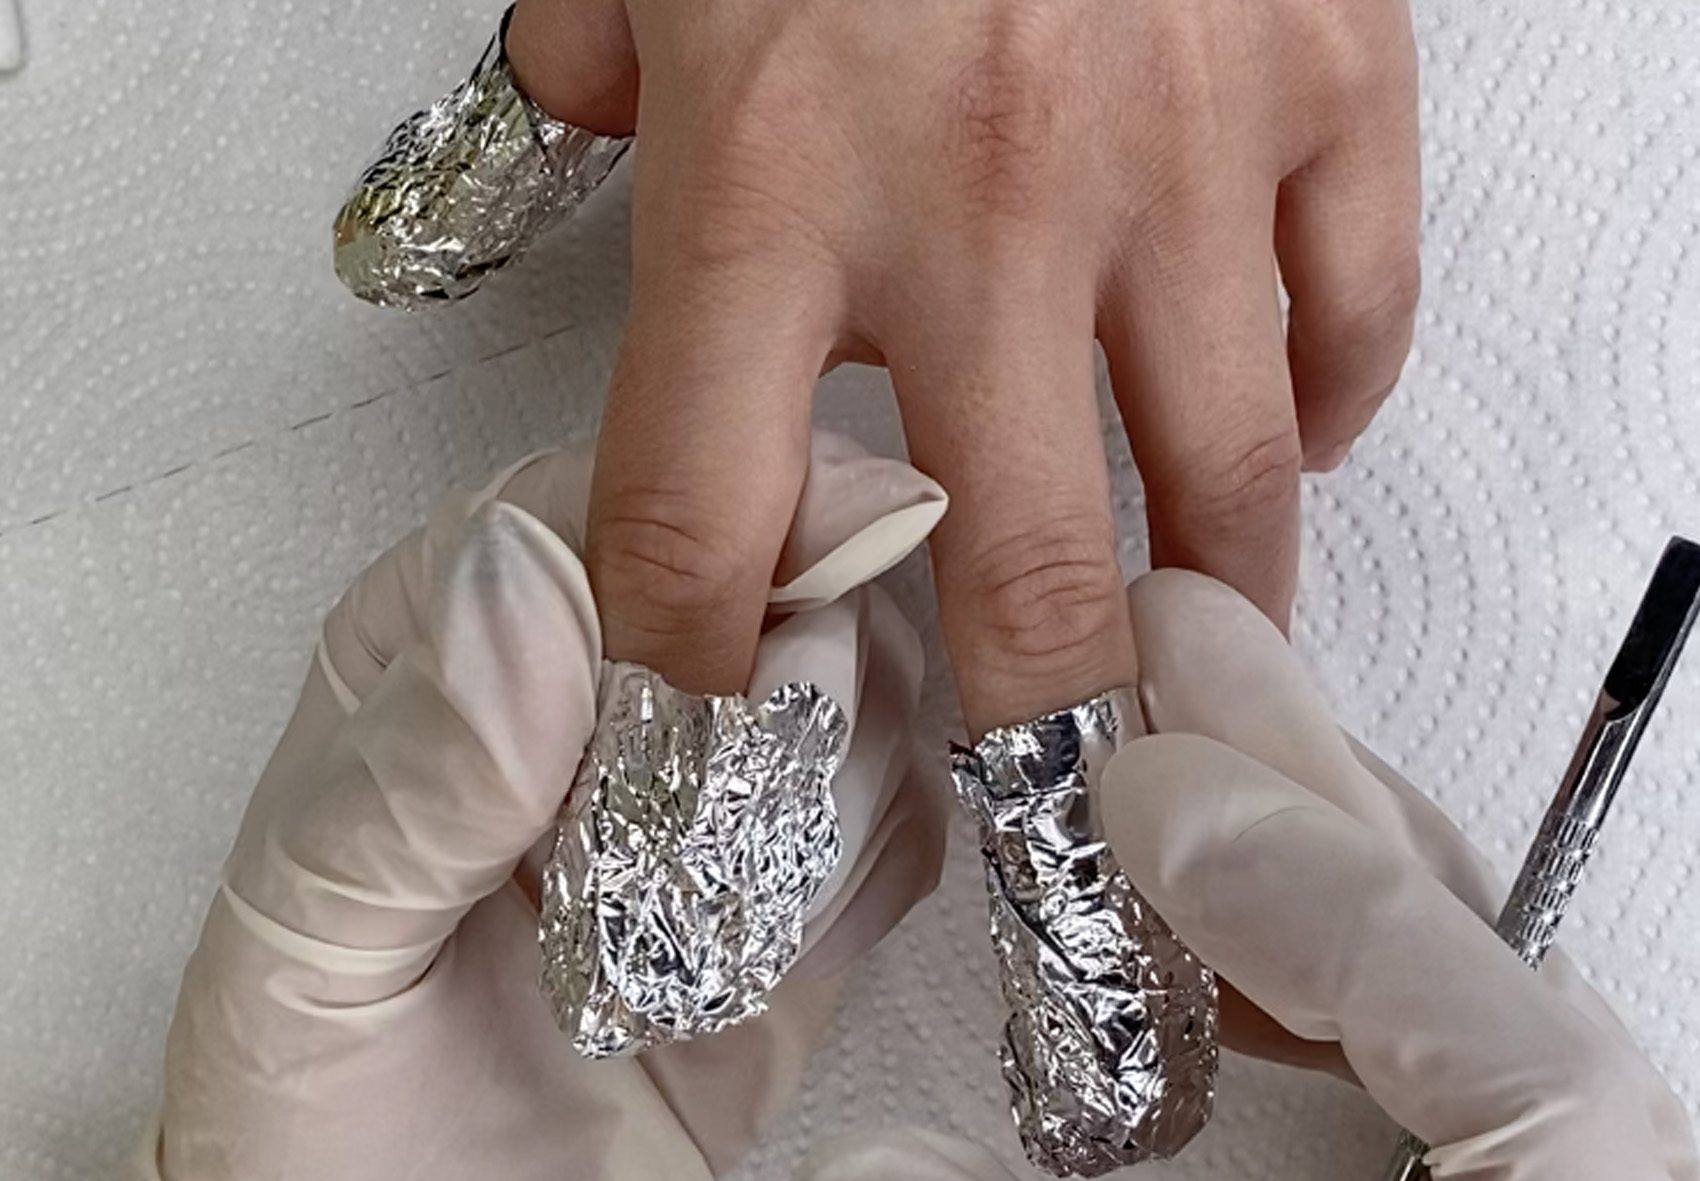
- Place soaked cotton on each nail.
- Wrap nails with aluminum foil to secure the cotton.
- Allow nails to soak for 20-30 minutes.
- Remove foil and cotton, check if acrylic is loosened.
- Gently push off the acrylic using a cuticle pusher.
Finish with nail health maintenanceby applying cuticle oil. This will help in damaged nails recoveryand keep them healthy.
Alternative Soaking Solutions
If you’re looking for nail polish remover alternatives, several options exist. These alternatives are great for those who prefer home remedies for acrylic nails.
Consider these solutions:
- Warm Water and Soap: Soak nails in warm soapy water for 15-20 minutes. This softens the acrylic, making removal easier.
- Vinegar and Lemon Juice: Mix equal parts of vinegar and lemon juice. Soak nails for 20-30 minutes. The acidity helps dissolve the acrylic.
- Rubbing Alcohol: Use rubbing alcohol as a soak. It works similarly to acetone but is less harsh.
Here’s a simple comparison table:
| Solution | Time | Effectiveness |
|---|---|---|
| Warm Water and Soap | 15-20 mins | Moderate |
| Vinegar and Lemon Juice | 20-30 mins | Moderate |
| Rubbing Alcohol | 20-30 mins | Moderate |
For manicure tips, always moisturize your nails post-removal. This ensures nail health maintenanceand promotes strength. Choose a method that suits your needs and preferences.
Filing Technique
Acrylic nails add style and flair to your look. But when it’s time to remove them, the process can feel daunting. One effective method involves the filing technique, which is gentle and precise. This technique requires patience and care, helping ensure that your natural nails stay healthy. By understanding the right filing methods, you can safely remove acrylic nails at home.
Gentle Filing Process
Filing your acrylic nails correctly is key to a successful removal. Start by choosing the right tools. A coarse nail file, around 100 grit, works best for reducing the bulk of the acrylic.
- Prepare Your Workspace:Use a towel or cloth to catch any dust.
- File in One Direction:This prevents splitting and ensures a smooth surface.
- Focus on the Top Layer:Gently file the topcoat of the acrylic. This helps loosen the bond.
- Check Your Progress:Stop and observe your nails to avoid over-filing.
Once the top layer is removed, switch to a finer grit file, around 180, to tackle the remaining acrylic. Filing in a circular motion helps maintain even pressure. This gradual process ensures that the natural nail underneath remains intact. Keep a steady hand and take your time. Patience is crucial.
Avoiding Nail Damage
Preventing nail damage while filing requires attention to detail. The health of your natural nails is as important as removing the acrylic.
- Use Light Pressure:Heavy pressure can weaken the nail bed.
- Avoid Filing Too Deep:Stop once you reach the base layer of acrylic. Over-filing can lead to thin, fragile nails.
- Moisturize Regularly:Apply cuticle oil to keep nails hydrated. This reduces the risk of breakage.
- Take Breaks:Give your nails time to breathe between filing sessions.
| Filing Tip | Benefit |
|---|---|
| File Slowly | Prevents mistakes and over-filing |
| Check Progress | Keeps natural nails safe |
| Hydrate Nails | Maintains nail health |
By following these steps, you can safely remove acrylics without compromising your nail health. The goal is to have strong, healthy nails after the acrylics are gone.
:max_bytes(150000):strip_icc()/How-to-Safely-Remove-Fake-Nails-54dacd3f9648421488d2ad099fb9d721.png)
Credit: www.byrdie.com
Cuticle Care
Taking care of your cuticles is crucial when removing acrylic nails. They are the delicate skin around your nails and need special attention. Proper cuticle care ensures healthy nail growth and prevents damage. Let’s explore the best practices for keeping your cuticles healthy during this process.
Moisturizing Cuticles
Moisturizing your cuticles is essential to maintain their health. Dry cuticles can crack and become painful. Here are some effective ways to keep them hydrated:
- Use Cuticle Oil:Apply cuticle oil regularly to keep them soft. Oils like jojoba and almond are excellent choices.
- Hand Creams:A good hand cream can also help. Choose one with natural ingredients for better results.
- Soak in Warm Water:Soaking your nails in warm water for a few minutes can help. It softens the cuticles, making them easier to manage.
Consider this simple routine to maintain moisture:
| Step | Action |
|---|---|
| 1 | Apply cuticle oil twice a day |
| 2 | Use hand cream after washing hands |
| 3 | Soak nails in warm water once a week |
Gentle Pushing Back
Pushing back your cuticles gently is a vital step in cuticle care. This process should be done with caution to avoid damage. Here’s how to do it safely:
- Soften the Cuticles:Soak your nails in warm water for about 5 minutes. This softens the cuticles, making them easier to push back.
- Use a Cuticle Pusher:A wooden or rubber cuticle pusher is ideal. Avoid metal pushers as they can be harsh.
- Push Gently:Press the pusher against the cuticle with light pressure. Move in small, circular motions.
Here are some important tips to remember:
- Be Gentle:Avoid pushing too hard to prevent damage.
- Regular Care:Include this in your nail care routine to maintain healthy cuticles.
- Hydrate Afterward:Apply cuticle oil after pushing back to keep them nourished.
Following these steps ensures your cuticles remain healthy and strong. Remember, the key is to be gentle and consistent with your care routine.
Post-removal Care
Removing acrylic nails can leave your natural nails feeling weak and damaged. Proper post-removal care is essential to restore their strength and health. Once you’ve successfully removed the acrylics, focus on nourishing and protecting your nails. This ensures they regain their natural beauty and resilience. The following tips will guide you through nail strengthening and hydration, helping your nails look and feel their best.
Nail Strengthening Tips
Strengthening your nails after acrylic removal is crucial. Weak nails can break easily and may take longer to grow back. Follow these tips to enhance their strength:
- Use a Nail Hardener:Nail hardeners can provide extra support. Apply regularly to protect against breakage.
- Biotin Supplements:Biotin is known to improve nail strength. Consider adding this vitamin to your daily routine.
- Avoid Harsh Chemicals:Limit exposure to chemicals. This includes cleaning products and nail polish removers containing acetone.
- Gentle Filing:File your nails gently. Use a soft nail file to smooth edges and prevent splits.
Consistent care will help your nails regain their natural strength. Consider creating a routine that includes the above tips. This will ensure lasting health for your nails.
Hydration And Moisture
Hydrating your nails is key to restoring their health post-acrylic removal. Dry nails can become brittle and prone to splitting. Here are some ways to keep them hydrated:
- Moisturizing Creams:Apply creams regularly. Look for products specifically designed for nails and cuticles.
- Coconut Oil:Coconut oil provides deep hydration. Massage into nails and cuticles daily.
- Drink Plenty of Water:Hydration begins from within. Ensure you drink adequate water each day.
- Avoid Excessive Washing:Limit exposure to water. Overwashing can strip natural oils from your nails.
These practices will keep your nails hydrated and supple. Regular moisturizing will prevent brittleness and improve overall nail health.
Common Mistakes
Removing acrylic nails at home can be tricky. Many people make common mistakes that can damage their nails. Understanding these mistakes helps in ensuring healthy nails and a smooth removal process.
Rushing The Process
Patience is key when removing acrylic nails. Rushing the process often leads to damage. Here are some common errors when in a hurry:
- Skipping the Soak:The acetone soak is crucial. It softens the acrylic for easy removal. Without it, nails can tear.
- Insufficient Time:Soaking in acetone takes time. Many rush and cut the time short. This leaves the acrylic hard and difficult to remove.
- Using Wrong Tools:Quick fixes like using sharp objects can harm the nail bed. Stick to proper tools like a nail file or buffer.
Consider the following table for an optimal soaking time:
| Step | Recommended Time |
|---|---|
| File down the top layer | 5 minutes |
| Soak in acetone | 20-30 minutes |
| Remove softened acrylic | 10 minutes |
Using Excessive Force
Another mistake is using excessive force during removal. This can lead to serious damage:
- Peeling Off Acrylic:Peeling damages the natural nail surface. It can cause splitting and weakening.
- Forcing Off with Tools:Using metal tools to pry off acrylic is harmful. It can lead to painful nail injuries.
- Scraping Aggressively:Gentle scraping is fine. Aggressive scraping can strip layers from your natural nail.
To avoid forceful removal, consider these tips:
- Use a Nail Buffer:Gently buff off any remaining acrylic.
- Apply Cuticle Oil:Softens the residue and moisturizes the nail.
- Repeat Soaking:If acrylic is stubborn, soak again instead of pulling.
Remember, gentle methods protect your nails and keep them healthy.
How To Remove An Acrylic Nail At Home?
Removing acrylic nails at home can seem challenging, but with the right approach, it can be done safely. While professional help is always an option, knowing how to do it yourself can save time and money. The key is to use gentle removal techniques that won’t harm your natural nails. Let’s explore how to remove acrylic nails at home effectively.
What Makes Acrylic Nails Come Off Faster?
Understanding what makes acrylic nails come off faster can help you in the Acrylic Nail Removal process. Various factors can affect how quickly these nails detach from the natural nail:
- Moisture Exposure:Regular contact with water can weaken the adhesive.
- Quality of Application:Poorly applied nails tend to lift sooner.
- Nail Growth:As your natural nails grow, the bond weakens.
- Use of Harsh Chemicals:Acetone and other chemicals can accelerate lifting.
A table illustrating some common factors and their impact on the removal speed:
| Factor | Impact on Removal Speed |
|---|---|
| Moisture Exposure | Increases |
| Quality of Application | Varies |
| Nail Growth | Increases |
| Harsh Chemicals | Increases |
How Do Salons Remove Acrylic Nails?
Salons use specific Salon Procedures to ensure safe and effective acrylic nail removal. Here’s a step-by-step guide of what to expect:
- Nail Clipping:The acrylic nails are cut short using a nail clipper.
- Filing:A nail file is used to thin out the acrylic layer.
- Soak-Off Method:Nails are soaked in acetone for about 20-30 minutes.
- Removal:Once softened, the acrylic is gently scraped off with a cuticle pusher.
- Nail Care:Moisturizing oils or creams are applied to keep nails healthy.
These steps highlight the importance of professional tools and techniques in preventing Nail Damage.
How To Remove Acrylic Nails With Hot Water?
Using hot water is a simple and effective DIY Nail Removal method. It’s gentle and doesn’t require harsh chemicals. Here’s how to perform a Hot Water Soak at home:
- Prepare a Bowl:Fill a bowl with warm water, ensuring it’s not too hot.
- Soak Nails:Submerge your nails in the water for 20-30 minutes.
- Check for Looseness:Gently try to lift the acrylic with a cuticle pusher.
- Repeat if Necessary:If the nails are still firm, soak for another 10 minutes.
This method helps in Nail Damage Prevention by avoiding harsh chemicals. Regularly moisturizing your nails after removal maintains Nail Health.
Credit: www.raycochrane.co.uk
Credit: www.youtube.com
Frequently Asked Questions
How Can I Safely Remove Acrylic Nails?
To safely remove acrylic nails, soak them in acetone for 20 minutes. Use a cuticle pusher to gently lift the acrylic. Avoid ripping or forcing it off, as this can damage your natural nails. Moisturize your nails after removal to keep them healthy.
What Tools Do I Need For Removal?
You’ll need acetone, a nail file, a cuticle pusher, and cotton balls. A bowl for soaking is helpful. These tools help soften and remove the acrylic safely. Ensure you work gently to avoid damage to your natural nails.
How Long Does It Take To Remove Acrylic Nails?
Removing acrylic nails usually takes about 30 to 45 minutes. The process includes soaking, scraping, and filing. Patience is key to avoid damaging your nails. Allowing enough time ensures a safe and effective removal.
Can I Remove Acrylic Nails At Home?
Yes, you can remove acrylic nails at home using acetone. Follow a step-by-step process for safe removal. Ensure you have the right tools and take your time. Home removal can save money, but be gentle to avoid damage.
Conclusion
Removing acrylic nails at home can be easy. With the right tools, it’s safe. Follow each step carefully. Patience is key during the process. Don’t rush and risk damage. Your nails will thank you later. Regular breaks help your natural nails breathe.
Remember, practice makes perfect. Keep nails moisturized afterward. Healthy nails look better and feel better. Share these tips with friends. They might find them helpful too. Enjoy your natural nails once they’re free. Treat them well and they will stay strong.
Relax and celebrate your nail care success!
Amazon and the Amazon logo are trademarks of Amazon.com, Inc, or its affiliates.