As an Amazon Associate I earn from qualifying purchases.
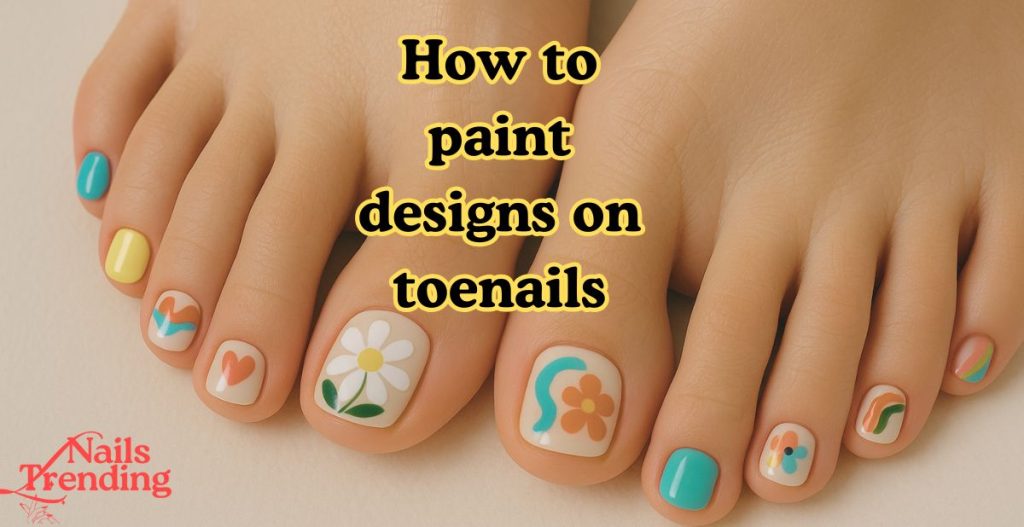
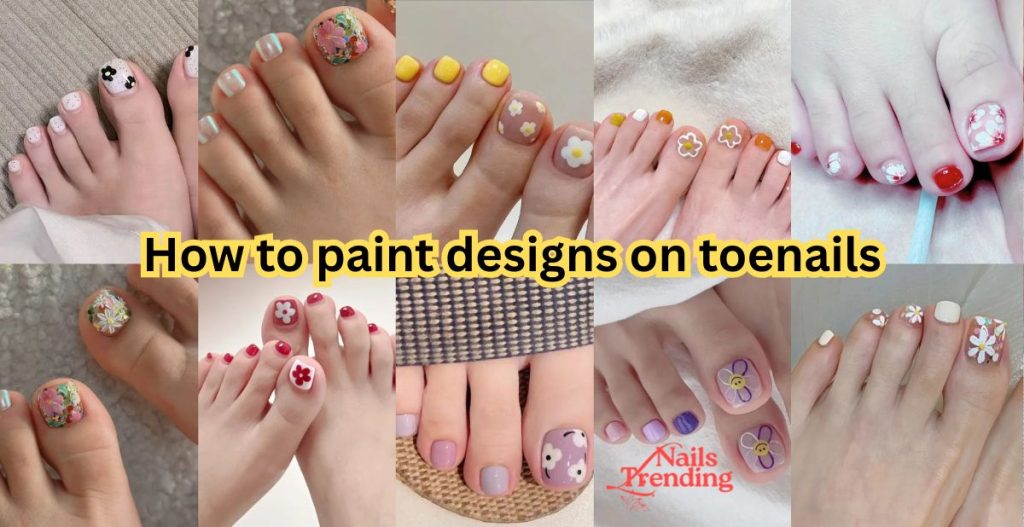
Have you ever wondered how to paint designs on toenails without spending hours or money at the salon? Nail art isn’t just for your fingertips anymore—decorated toenails are becoming a fun, stylish way to express yourself, especially during sandal season.
I still remember my first attempt at painting little daisies on my big toenails before a beach trip. The flowers weren’t perfect, but every time I looked down, they made me smile. That’s the beauty of toenail art—it doesn’t have to be flawless to be fun. With a few tricks, the right tools, and some creativity, you can turn your toenails into tiny canvases that show off your personality.
In this guide, we’ll walk through everything you need to know:
- Step-by-step instructions for painting toenail designs at home
- Easy tricks to make the process smoother (even if you’re a beginner)
- Cute and matching design ideas for nails and toes
- Expert tips for long-lasting, salon-quality results
Whether you want playful polka dots, chic stripes, or matching nails and toenails for a polished look, this article will give you the confidence to create designs you’ll love.
Why Paint Designs on Toenails?
Painting designs on your toenails is more than just a beauty trend—it’s a form of self-expression and self-care. Here’s why so many people are embracing toenail art at home:
1. Express Your Individuality and Creativity
Your toenails are like a blank canvas waiting to be decorated. Whether you love simple dots and stripes or more detailed floral patterns, nail art allows you to showcase your personality in a subtle but stylish way. For example, someone who loves nature might go for leafy designs, while a minimalist might choose elegant geometric lines.
2. Save Money Compared to Salon Pedicures
Regular salon pedicures with designs can quickly add up. By learning how to paint toenails with designs at home, you’re not only saving money but also gaining the freedom to change your look whenever you feel like it. A few bottles of polish, some tools, and a little practice can give you professional-looking results without the recurring expense.
3. Match Nails and Toenails for Events or Vacations
Coordinating your nails and toenails can instantly make your look more polished and put together. Whether it’s a wedding, a beach trip, or a night out, matching nails and toes designs create a cohesive style that ties your whole outfit together. Cute matching sets also look great in photos and add that extra detail to your personal style.
4. Boost Confidence and Enhance Your Self-Care Routine
There’s something uplifting about glancing down and seeing beautifully painted toenails. Even small, simple designs can make you feel more put-together and confident. Plus, the process itself—taking time to pamper your feet, choose colors, and carefully paint—can be a relaxing form of self-care that reduces stress and improves your mood.
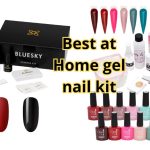
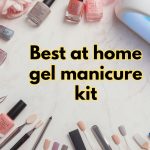
Essential Tools & Supplies You’ll Need
Before you dive into painting designs on your toenails, it’s important to have the right tools. Having everything ready not only makes the process smoother but also ensures cleaner, more professional-looking results. Here’s a list of must-haves:
1. Nail Polish Essentials
- Base coat – Protects your natural nails from staining and helps polish adhere better.
- Color polishes – Choose a few shades that complement each other. Having at least one neutral and one bold shade gives you versatility.
- Top coat – Seals in your design, adds shine, and helps prevent chipping.
2. Design Tools
- Dotting tools or thin brushes – Great for creating flowers, dots, and detailed patterns.
- Household alternatives – If you don’t have nail art brushes, everyday items like a toothpick, bobby pin, or even a straightened paperclip can do the trick.
3. Nail Prep and Cleanup Supplies
- Nail polish remover – For correcting mistakes and prepping nails before you begin.
- Cotton pads or Q-tips – Useful for wiping away polish or cleaning up edges.
4. Pattern Helpers
- Nail tape or striping tape – Helps you create crisp lines, stripes, and geometric designs.
- Stickers or decals – Perfect for beginners who want a quick design without freehand painting.
5. Optional but Helpful Extras
- Quick-dry spray or drops – Cuts down drying time, making it easier to layer designs without smudging.
- Small cleanup brush – Dipped in remover, it tidies up polish around the cuticles for a salon-quality finish.
With these tools on hand, you’ll be well-prepared to experiment with designs and achieve a neat, polished look every time.
Step-by-Step Guide: How to Paint Designs on Toenails
Creating cute toenail designs at home is easier than you think—especially if you break it down into simple steps. Here’s a beginner-friendly guide to help you achieve salon-worthy results without the salon price tag.
Step 1: Prep Your Toenails
Good preparation is the secret to long-lasting nail art.
- Trim, file, and buff your toenails so they’re smooth and even.
- Push back cuticles gently with a cuticle stick to create more nail space for your designs.
- Apply a base coat to protect your nails from staining and help the polish last longer. This also gives your design a smooth surface to stick to.
Pro Tip: If you have ridged nails, use a ridge-filling base coat for an extra-smooth canvas.
Step 2: Choose a Design
Your design can be as simple or as intricate as you’d like.
- Beginner-friendly ideas: Polka dots, stripes, or glitter tips—these look great and are hard to mess up.
- Intermediate to advanced designs: Try tiny flowers, geometric shapes, or abstract swirls for a more artistic look.
Pro Tip: Browse Pinterest or Instagram for inspiration, but start small—practice one design on your big toenail first before attempting all ten.
Step 3: Painting the Design
This is where the fun begins.
- Keep a steady hand: Rest your wrist on a flat surface to avoid shaky lines.
- Tricks for even polish: Use thin coats rather than thick layers—it dries faster and looks smoother.
- Use tape for clean lines: Nail tape or even a small strip of regular tape can help you create straight edges and color-block patterns.
- Dotting for flowers or accents: Dip a dotting tool, bobby pin, or toothpick into polish to create dots for petals, polka dots, or other accents.
Pro Tip: If you make a mistake, don’t panic. Just dip a small brush in polish remover and gently erase the error.
Step 4: Seal & Protect
Once your design is complete, it’s time to lock it in.
- Apply a clear top coat to add shine and prevent chipping.
- Reapply every few days if you want your toenail designs to last longer.
- Speed up drying with quick-dry drops or spray to avoid smudges when moving around.
Pro Tip: Be patient—give your toenails at least 15–20 minutes to dry completely before putting on socks or shoes.
Matching Nails and Toenails: Creating a Cohesive Look
There’s something effortlessly stylish about having your nails and toenails match. It creates a polished, put-together appearance that makes even the simplest outfit feel more intentional. Whether you’re headed to a wedding, vacation, or just want to elevate your everyday style, coordinating your nails and toes is a simple trick that always works.
Why Coordinating Nails and Toes Enhances Your Overall Style
When your nails and toenails complement each other, your whole look feels more balanced. Matching sets draw the eye in a subtle way, showing attention to detail without being over-the-top. It’s like accessorizing—only with polish instead of jewelry.
Cute Matching Nails and Toes Designs
- Same Color, Different Design
- Paint your fingernails and toenails the same base color, but switch up the details. For example, soft pink polish on both, but tiny gold dots on your nails and a single accent nail with glitter on your toes.
- Complementary Shades
- Choose two colors that look beautiful together—like navy blue nails paired with silver toes, or pastel lavender nails with soft mint toes. These combinations feel coordinated without being identical.
- Seasonal or Holiday Themes
- Match your nails and toes to the season or a holiday. Think red and gold accents for Christmas, pastel tones for spring, or tropical shades like coral and teal for summer vacations.
A Personal Touch
I remember matching my nails and toes in soft blush pink with tiny white floral accents before a close friend’s wedding. Not only did it look elegant with my dress, but it also gave me a confidence boost. Every time I looked down at my hands or feet, I felt extra polished and photo-ready.
Tricks & Tips to Painting Toenails Like a Pro
Even with practice, painting toenails can be a little tricky—especially when you’re working with tiny designs. The good news? With the right techniques and a few clever hacks, you can achieve clean, salon-worthy toenail art at home. Here are some expert tips to make the process easier:
1. How to Avoid Smudging
- Give each layer time to dry before applying the next coat or adding designs. Rushing is the fastest way to ruin your work.
- Use a quick-dry top coat or drops to speed things up and minimize the risk of accidental smears.
- Be mindful of footwear—avoid socks or closed shoes for at least 20 minutes after painting.
2. Best Posture for Steady Hands
- Sit at a table or desk and rest your foot on a flat surface rather than bending over uncomfortably. This gives you more control.
- Anchor your painting hand by resting your wrist on your knee or table to reduce shaking.
- Good lighting is key—make sure you’re working in a bright space so you can see details clearly.
3. Quick Fixes for Mistakes
- For polish outside the nail: Dip a small brush or Q-tip in nail polish remover and gently clean around the edges.
- For smudges: Smooth the area lightly with your fingertip and reapply a thin coat of polish.
- For uneven lines: Use striping tape to straighten edges and cover small errors with an accent design.
4. Using Stickers, Decals, or Stamps for Easy Designs
Not confident with freehand painting? Nail stickers, water decals, and stamping kits are lifesavers. They offer intricate patterns (like lace, flowers, or geometric prints) that look professional with minimal effort. Just apply them over dry polish and seal with a top coat.
5. DIY Hacks with Everyday Items
- Toothpicks or bobby pins – Perfect for dots, small flowers, or tiny accents.
- Tape – Helps create crisp lines, French tips, or color-blocked designs.
- Q-tips – Great for cleanup and small design work.
- Makeup sponges – Can be used for gradient or ombré effects.
With these tips, you’ll not only avoid common nail art mistakes but also discover clever shortcuts that make painting toenails more fun and less frustrating.
Common Mistakes to Avoid
Even the best toenail designs can fall flat if you skip key steps or rush the process. Here are some of the most common mistakes people make—and how to avoid them.
1. Skipping Base or Top Coat
It’s tempting to dive straight into painting, but skipping the base coat leaves your nails vulnerable to staining and chips. Likewise, a missing top coat means your designs won’t last long. Always sandwich your color between a protective base and top coat for the best results.
2. Rushing Drying Time
We’ve all been there—painting toenails and then immediately slipping on socks or shoes. The result? Smudges, dents, and ruined designs. Take your time and let each layer dry fully before moving on. Using quick-dry drops or sprays can help speed things up if you’re in a rush.
3. Overloading the Brush with Polish
Applying too much polish at once leads to thick, uneven layers that take forever to dry and often bubble. Instead, wipe excess polish off the brush and use thin, even coats. You can always build up color with multiple layers.
4. Ignoring Toenail Prep
Skipping nail prep is one of the biggest mistakes. Failing to trim, buff, and push back cuticles means polish won’t adhere properly, and designs may look messy. Think of prep as setting the stage for your artwork—without it, even the best designs won’t shine.
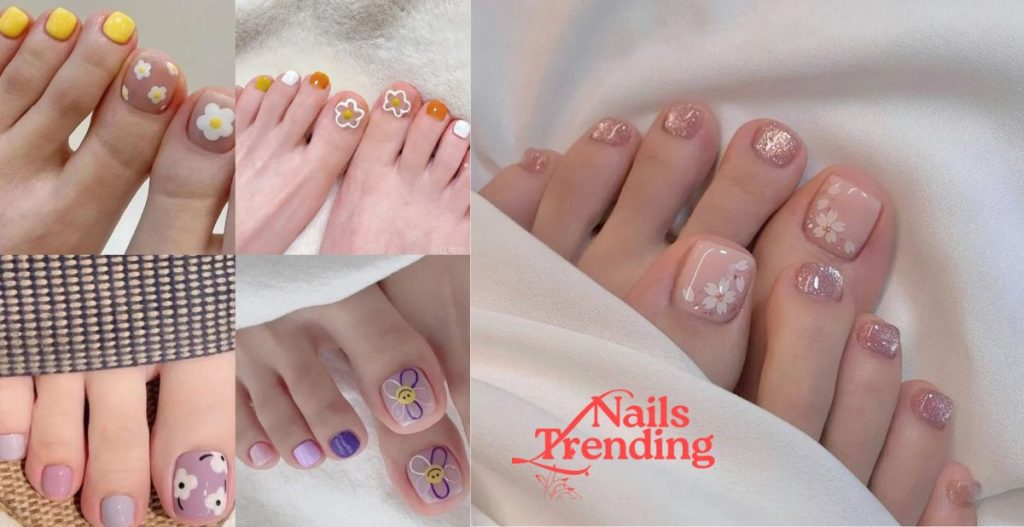
Inspiration: Cute Design Ideas to Try at Home
Sometimes, the hardest part of painting toenails is deciding on a design. Here are some creative ideas that are fun, easy, and perfect for all skill levels:
1. Minimalist Dots and Stripes
Simple yet chic, small dots or thin stripes on a neutral base can instantly elevate your toenails. Use a dotting tool or toothpick for precision. This design is perfect for beginners who want a clean, stylish look.
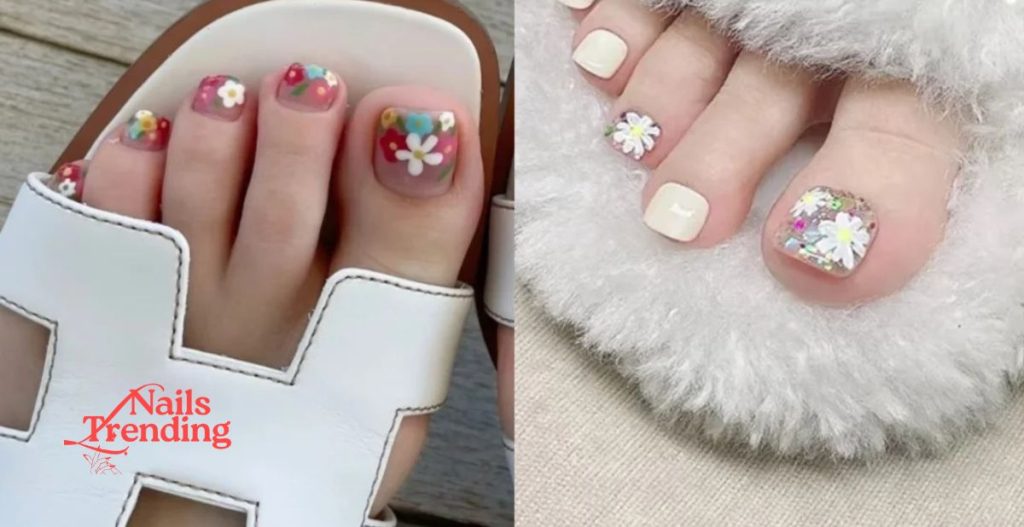
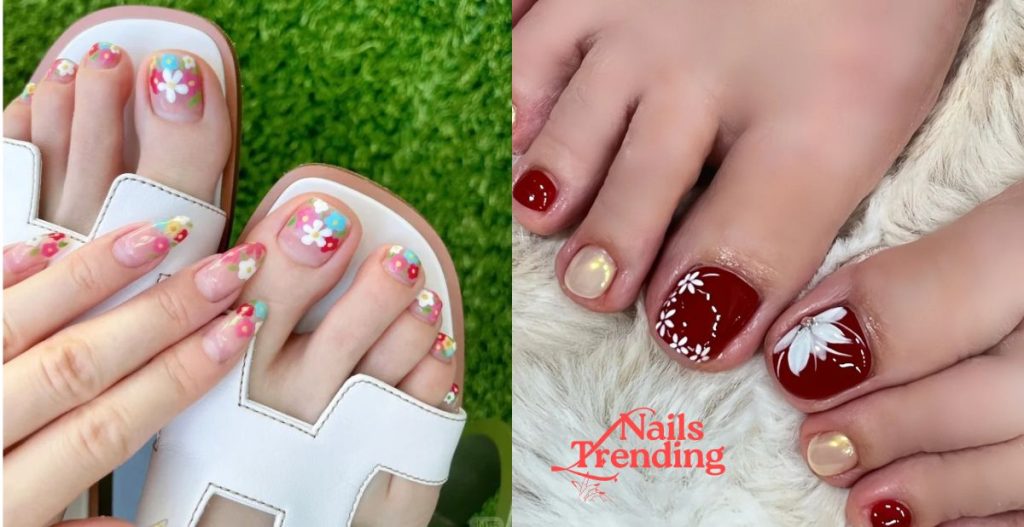
2. Floral Toe Art
Floral designs add a fresh, feminine touch. Start with small flowers on your big toes or accent nails, then complement with a soft solid color on the others. These can be painted freehand or applied with decals for ease.
3. Ombre Gradient Toenails
Create a smooth transition between two colors using a makeup sponge. Ombre designs are playful and trendy, ideal for spring and summer looks.
4. Glitter Accent Nails
Add a pop of sparkle to one or two toenails for an instant glam effect. Glitter works well over solid colors or as tips for a subtle shimmer.
5. Matching with Seasonal Outfits
Coordinate your toenail colors with your wardrobe or upcoming events. Think soft pastels for spring, bright neon for summer, or deep reds and golds for the holidays. Matching nails and toes with your outfits makes your overall look cohesive and polished.
FAQs (Optimized for Voice Search)
1. How can I paint toenails with designs if I’m a beginner?
Start with simple designs like dots, stripes, or glitter accents. Use household items like toothpicks or bobby pins as dotting tools, and apply a base and top coat for clean results.
2. What’s the easiest design for toenails at home?
Polka dots, stripes, and single-color accent nails are easiest. These designs require minimal precision but still look stylish.
3. Can I match my toenails with my fingernails?
Yes! You can choose the same color, complementary shades, or subtle variations like dots or floral patterns to create a cohesive look.
4. What are some tricks to painting toenails neatly?
Use thin coats, rest your hand on a flat surface, and allow each layer to dry fully. Dotting tools, tape, and stickers can help achieve cleaner designs.
5. How long do toenail designs usually last?
With a base coat, top coat, and careful handling, designs can last 5–10 days. Reapplying the top coat every few days helps extend longevity.
Conclusion
Painting designs on toenails is more than a beauty routine—it’s a creative and enjoyable form of self-expression. With the right tools, preparation, and techniques, anyone can achieve professional-looking results at home.
Personally, I’ve noticed that practicing consistently has transformed my nail art from simple stripes to detailed floral designs. Each attempt boosts confidence and encourages experimentation with new styles.
If you’ve been hesitant, now is the perfect time to try your first design. Start small, experiment with colors and patterns, and most importantly, have fun! Share your results or favorite techniques with friends or online communities—you might inspire someone else to start their nail art journey.
Amazon and the Amazon logo are trademarks of Amazon.com, Inc, or its affiliates.