As an Amazon Associate I earn from qualifying purchases.
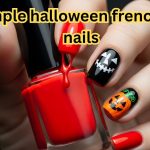
Simple Halloween French tip nails are taking over this spooky season — and for good reason. They strike that perfect balance between elegant and festive, making them ideal for anyone who loves a touch of Halloween spirit without going overboard. Whether you’re dressing up for a party or keeping it classy at work, these designs let you celebrate the season with style and subtlety.
What makes this trend special is how the timeless French manicure meets modern Halloween creativity. Instead of wild patterns or over-the-top nail art, you get clean, minimal designs — maybe a hint of black tips, ghostly white lines, or a pop of orange. The result? Nails that look sophisticated yet playful, perfect for both office hours and costume nights.
And here’s the truth: your nail shape can completely change the vibe of your manicure. A coffin shape brings boldness, almond nails add elegance, and short nails keep things practical and cute. So, when you combine the right shape with a simple Halloween French tip design, you get a look that’s effortlessly stylish and flattering on everyone.
Personally, after years of trying intricate Halloween nail art — spider webs, pumpkin decals, glitter overload — I’ve found myself coming back to simplicity. There’s something undeniably chic about clean lines and subtle Halloween accents. They make me feel put-together, festive, and still totally myself.
In this article, we’ll explore why simple Halloween French tip nails are the go-to trend this year, how to choose the best style for your nail shape, and the easiest ways to achieve this look at home (or ask your nail tech for it). Whether you prefer short, coffin, or almond nails, you’ll find plenty of ideas to match your vibe — and maybe even a few pro tips to make your manicure last through all your October plans.

How to Create Simple Halloween French Tip Nails (Step-by-Step)
If you love the timeless elegance of French tips but want to give them a spooky twist this season, simple Halloween French tip nails are the perfect choice. They’re stylish, easy to do at home, and look stunning for both parties and everyday wear. Follow this easy step-by-step guide to achieve a flawless, festive manicure.
What You’ll Need:
- Base coat (to protect your natural nails)
- Orange, black, or white nail polish (Halloween-inspired colors)
- Thin nail art brush or French tip tape
- Halloween nail stickers or decals (like bats, spider webs, or ghosts)
- Fine glitter (optional – for a sparkling effect)
- Glossy or matte top coat
Step 1: Prep Your Nails Properly
Start with clean, dry nails. Remove any old polish and gently file your nails into your desired shape — square, round, or coffin. Push back your cuticles and apply a thin layer of base coat to protect your nails from staining and to help your polish last longer.
Step 2: Choose Your Halloween-Inspired French Tip Color
Who says French tips have to be white? This Halloween, try something fun and festive like black, burnt orange, or deep purple tips. For a subtle twist, you can even do alternating colors — one hand orange, the other black. If you prefer short nails, keep the tips thin and neat; for coffin nails, go bold with thicker, dramatic tips.
Step 3: Add Subtle Spooky Elements
Now it’s time to bring your Halloween theme to life! Using your thin brush, draw tiny bats, cobwebs, or ghost outlines near the tips. If freehand art feels tricky, use stickers or decals for a clean, professional look. Add a hint of fine glitter on one or two nails to give them a magical touch without losing the minimalist vibe.
Step 4: Seal with a Glossy or Matte Top Coat
Once your design is dry, apply a generous layer of top coat to seal everything in. A glossy top coat gives your nails a shiny, polished look, while a matte finish adds a chic, modern edge. Either way, it will help prevent chipping and extend the life of your manicure.

Personal Tip:
My go-to top coat for a salon-quality finish is Seche Vite Dry Fast Top Coat. It dries quickly, adds a high-gloss shine, and keeps my nails chip-free for days. It’s perfect if you want your Halloween manicure to look fresh all week long — even through trick-or-treating or party nights!
Best Ideas for Simple Halloween French Tip Nails
Ready to get inspired? Here are some of the best simple Halloween French tip nail ideas that blend class with creativity. Whether you have short nails, coffin-shaped tips, or want to try something with a little twist — these looks will help you nail the spooky season in style.
Simple Halloween French Tip Nails for Short Nails
Short nails might seem limiting, but in reality, French tips look incredibly flattering on them. The clean line of the tip elongates the fingers, giving an illusion of longer nails while keeping things practical and comfortable for daily wear.
Minimalist designs are perfect for short nails — think tiny orange tips, subtle ghost outlines, or delicate spider web corners. These designs add just the right amount of Halloween flair without overwhelming your nail space.
If you’re short on time, Halloween-themed nail stickers or press-ons are your best friends. They’re quick to apply, affordable, and available in tons of styles like mini bats, pumpkins, or candy corn patterns.
My go-to design for last-minute Halloween plans: nude base with sleek black tips and one accent nail featuring a tiny silver spider web. It looks chic, takes less than 20 minutes, and always earns compliments!

Simple Halloween French Tip Nails – Coffin Shape
If you love bold, statement-making nails, coffin-shaped nails are your Halloween dream canvas. Their long, flat tips give you plenty of space to play with creative designs while maintaining a sleek, modern look.
Try black-and-nude ombré tips for a smoky, mysterious vibe or blood-drip tips for that classic spooky touch. Another trending look is white skeleton lines along the nail edges — elegant yet eerie enough for October nights.
The trick to balancing spooky and sophisticated is keeping your base neutral (like beige or soft nude) and letting your tips do the talking. Add fine glitter or metallic accents for a hint of glam without overpowering the design.
Pro tip: To achieve salon-quality results at home, use gel polish for durability and cure each layer under a UV lamp. I personally love pairing black tips with a clear jelly base — it gives that glassy finish coffin nails are known for.
Simple Halloween French Tip Nails with a Twist
Want to take your Halloween French tips up a notch? Add a creative twist with unexpected color combinations or playful accents.
Some trendy combos include orange and black, purple and silver, or nude and blood-red tips — each offering a distinct Halloween vibe. For a softer look, go for nude nails with glittery silver or black French tips that shimmer under the light.
To add extra flair, include an accent nail with a small design — like a ghost, pumpkin, or gradient glitter fade. These little details make your manicure look custom and high-end, even if you did it yourself.
Easy DIY idea for beginners: Apply a nude base, use tape to create black French tips, then finish with a matte top coat and one tiny orange pumpkin sticker on your ring finger. Simple, affordable, and totally Instagram-worthy!

Tips to Make Your Halloween French Tips Last Longer
You’ve spent time creating the perfect simple Halloween French tip nails — so it only makes sense to make them last! With the right prep, care, and a few insider tricks, your festive manicure can stay flawless for over a week. Here’s how to keep your spooky-chic look from chipping, fading, or losing its shine.
Nail Prep Secrets for Better Polish Adhesion
The foundation of a long-lasting manicure starts before you even open your nail polish. Proper prep ensures your polish grips to your nails instead of peeling off.
- Clean your nails thoroughly: Use a nail polish remover (even if you don’t have old polish) to eliminate natural oils.
- Buff lightly: Gently buffing the surface helps the polish adhere better.
- Dry nails completely: Any moisture can cause bubbles or premature lifting.
- Always use a quality base coat: It acts as a primer, protecting your natural nails and locking the polish in place.
Pro tip: Try using a sticky base coat — it creates a slightly tacky surface that helps polish bond stronger and last longer.

Avoiding Chips: Seal the Edges and Reapply Top Coat
One of the most common manicure mistakes is forgetting the edges. When you paint, seal the tips of your nails by brushing a small amount of polish along the edge. This step prevents premature chipping — especially important for French tips where color sits right at the edge.
After your design is done, apply a high-quality top coat and make sure to cover the nail edge again. To extend wear, reapply a thin layer of top coat every 2–3 days. It refreshes the shine and adds an extra layer of protection.
Bonus idea: A quick layer of cuticle oil after your top coat dries helps keep the area hydrated, reducing the risk of polish cracking.
Daily Habits to Protect Your Halloween Mani
Your everyday actions play a big role in how long your manicure lasts. Simple habits can make all the difference:
- Wear gloves while washing dishes or cleaning.
- Avoid using your nails to open cans, scrape stickers, or peel things.
- Apply cuticle oil daily to keep your nails and surrounding skin flexible.
- Moisturize your hands often — dry skin can make your polish lift at the edges.
Even when using gel or long-lasting polish, these small steps help your Halloween nails stay perfect for longer.

My Personal 5-Minute Nail Care Routine
Keeping my nails fresh all week doesn’t have to take forever. Here’s my quick daily routine that truly makes a difference:
- Wash hands with mild soap and dry thoroughly.
- Apply a drop of cuticle oil and massage it in.
- Gently buff any rough edges that might catch on fabric.
- Reapply a thin coat of clear top coat every other day.
- Finish with a dab of hand cream for softness and shine.
It’s just five minutes, but it keeps my Halloween French tips looking fresh, glossy, and chip-free through everything — from typing marathons to Halloween parties.
DIY vs. Salon: Which One Is Right for You?
When it comes to simple Halloween French tip nails, the big question is — should you DIY or go to a professional salon? Both options have their perks, and the right choice depends on your budget, skill level, and how much time you’re willing to invest. Let’s break it down.

Cost, Convenience, and Quality Comparison
- DIY (Do It Yourself):
Doing your own nails at home is the most affordable option. You only need a few basics — base coat, polish, and a steady hand. With practice, you can get great results and experiment with new ideas whenever you want. Plus, it’s convenient; you can do it while watching your favorite Halloween movie! However, the finish might not always be as smooth or durable as a professional manicure. If you’re new to nail art, freehand tips or detailed Halloween designs (like cobwebs or bats) can take some trial and error. - Salon:
Visiting a nail salon means precision, expertise, and longevity. Nail techs use high-quality tools and gel systems that last up to three weeks without chipping. You’ll also get access to advanced designs, like 3D nail art or ombré French tips. The downside? It’s pricier and takes time. A Halloween-themed French manicure might cost anywhere from $40 to $80, depending on design complexity and location.
When to DIY and When to Visit a Pro
- DIY is best when:
- You prefer simple, minimalist designs
- You’re on a budget
- You enjoy experimenting with seasonal nail looks
- You have short nails or use press-ons
- Go to a salon when:
- You want a detailed or intricate design (like blood-drip tips or 3D elements)
- You’re attending a special Halloween event
- You want your manicure to last two weeks or more
- You prefer gel or acrylic extensions
Tip: If you’re confident doing your own base and top coats, try a hybrid approach — DIY the basics, then visit a salon just for nail art.

My Honest Experience Trying Both Before a Halloween Party
Last Halloween, I decided to test both options. On one hand (literally), I tried DIY black-and-orange French tips at home using regular polish. On the other, I booked a gel French manicure at a salon with spider web accents.
Surprisingly, my DIY nails looked great in photos and lasted about four days. The salon version, though, stayed flawless for nearly two weeks — glossy, chip-free, and perfect for all the parties.
So, here’s my honest verdict:
If you love the creative process and don’t mind touching up — go DIY. But if you want professional-level perfection and long-lasting shine, treat yourself to a salon visit

FAQs
Are French tip nails good for Halloween?
Absolutely! French tips are timeless and easily adaptable for Halloween. You can add festive colors like orange, black, or blood-red and include tiny themed accents such as bats or pumpkins for a spooky yet elegant look.
What colors are best for Halloween French tips?
Classic Halloween shades include orange, black, white, purple, and red. For a chic twist, try metallic silver, glittery black, or nude with bold-colored tips. These combinations balance elegance and Halloween flair.
Can I do Halloween French tips on short nails?
Yes! French tips look amazing on short nails. In fact, short nails make the design look cleaner and easier to maintain. Try thin black or orange tips, or add a small spider web corner for a fun, minimal effect.
How do I make my French tips look more festive for Halloween?
Incorporate small design elements like mini ghosts, cobwebs, or glitter gradients. Even changing your tip color to a bold Halloween hue instantly transforms a classic French mani into something festive.
What nail shape looks best for Halloween French tips?
It depends on your style! Short square nails are practical and cute, while coffin and almond shapes offer more space for creative designs. Coffin nails, in particular, make a perfect canvas for dramatic Halloween looks.
Final Thoughts
Halloween is the perfect time to have fun with your nails, but remember — simple doesn’t mean boring. French tips bring elegance, and with a Halloween twist, they become effortlessly festive.
Whether you go for short orange tips or bold coffin-shaped black designs, the key is to embrace creativity while keeping it chic.
Personal takeaway: After trying countless Halloween nail trends, I’ve realized that simplicity often makes the boldest statement. A clean, subtle French tip with a spooky accent can speak louder than any over-the-top design.
So this Halloween, keep it simple, keep it spooky, and let your nails do the talking.
Amazon and the Amazon logo are trademarks of Amazon.com, Inc, or its affiliates.