As an Amazon Associate I earn from qualifying purchases.
Have you ever tried to drive a nail into a piece of wood, only to end up with a bent nail or a damaged surface? You’re not alone.
Many DIY enthusiasts and homeowners face this frustrating challenge. But what if there was a simple tool that could help you achieve a flawless finish every time? Enter the nail set tool—a game-changer for anyone looking to perfect their woodworking projects.
In this guide, you’ll learn how to use a nail set tool effectively, ensuring your nails are flush and your surfaces are pristine. Ready to transform your DIY skills and impress with your craftsmanship? Let’s dive in!
Credit: www.bradthepainter.com
What Is A Nail Set?
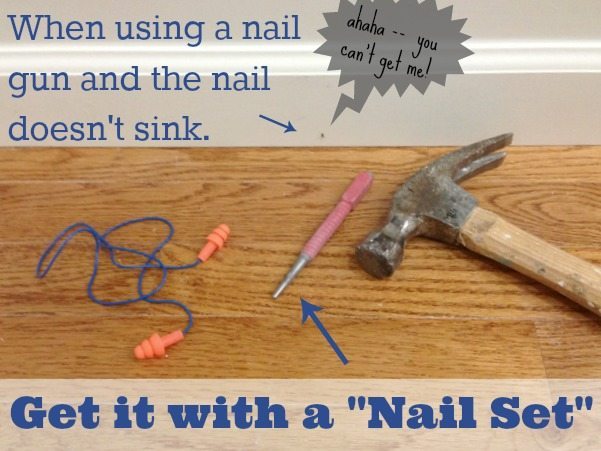
Working on a woodworking project? Or perhaps some home improvement? You might find a nail set to be a handy tool. But what exactly is a nail set? It’s a small yet essential tool that helps finish nails flush with or below the surface of the wood. This ensures a smooth, clean look, free from protruding nail heads. Understanding a nail set is crucial for perfecting your craft, whether you’re a DIY enthusiast or a seasoned carpenter.
A nail set, also known as a nail punch, is a tool used to drive nail heads below the surface of the wood. It allows you to hide nail heads with wood filler, creating a smooth finish. The tool comes in various sizes to accommodate different nail sizes. It’s an essential part of any woodworker’s toolkit.
Features Of A Nail Set
- Small and Compact:Its size makes it easy to handle and store.
- Variety of Sizes:Choose the right size for your nails.
- Durable Material:Often made from metal, ensuring long-lasting use.
How Does A Nail Set Work?
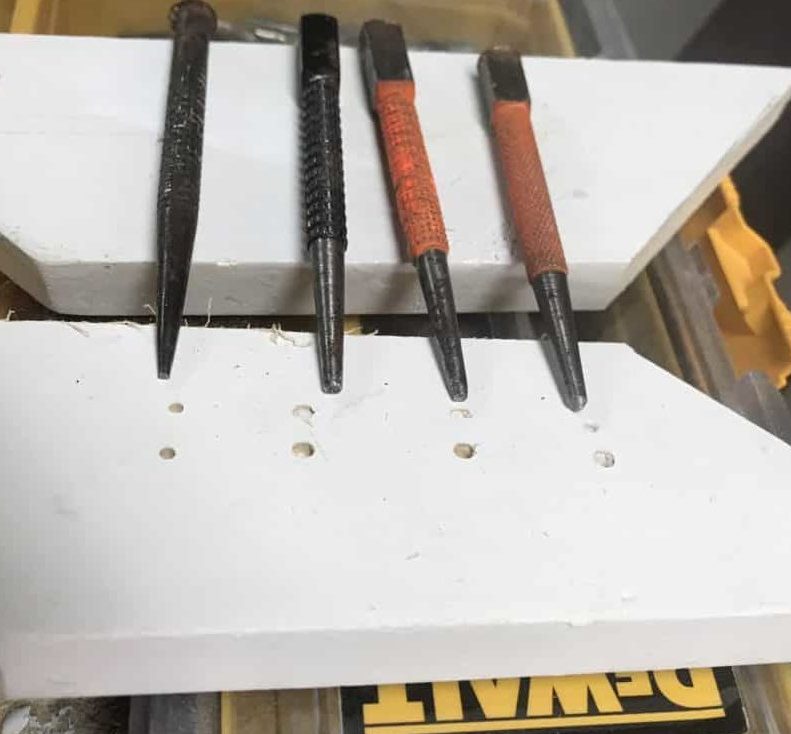
Using a nail set is simple. Place the tip on the nail head, then tap the other end with a hammer. This pushes the nail head below the surface of the wood. Once recessed, you can fill the hole with wood putty for a seamless finish.
Benefits Of Using A Nail Set
| Benefit | Description |
|---|---|
| Improved Aesthetics | Creates a smooth surface, hiding nails completely. |
| Safety | Reduces the risk of injury from exposed nails. |
| Professional Finish | Offers a clean, polished look to your projects. |
Types Of Nail Sets
Nail sets are essential tools for any DIY enthusiast or professional carpenter. Understanding the different types of nail sets can enhance your woodworking skills. Each type offers unique features and benefits for various carpentry techniques. Whether you’re involved in home improvement projects or mastering nail driving methods, knowing which nail set to use can make your tasks easier and more efficient.
Standard Nail Set
The Standard Nail Setis a classic choice among woodworking tools. It’s often used in traditional carpentry techniques and DIY nail setting. This tool features a small steel rod with a pointed tip, designed to drive nails below the surface of the wood.
- Simple Design:Easy to use, requiring only a hammer.
- Versatile:Suitable for various nail sizes.
- Cost-Effective:Affordable option for beginners.
Ideal for home improvement tools, the Standard Nail Set is perfect for projects like furniture building and trim work. When using it, hold the nail set directly over the nail and tap gently with a hammer. This technique prevents wood from splitting, ensuring a smooth finish.
| Pros | Cons |
|---|---|
| Easy to find | Requires manual effort |
| Inexpensive | Less precision |
Automatic Nail Set
The Automatic Nail Setoffers a modern twist to nail setting tools. This tool is designed for efficiency and precision, ideal for advanced nail set techniques. It features a spring-loaded mechanism that drives nails effortlessly.
- Quick Operation:Saves time with automatic action.
- Precision:Ensures accurate nail placement.
- Consistency:Delivers uniform results.
Perfect for carpentry techniquesthat demand accuracy, the Automatic Nail Set is a valuable addition to your tool collection. Simply position the tool over the nail and press down. The spring mechanism will drive the nail smoothly, reducing the risk of damaging the wood surface.
- Position the tool correctly.
- Press firmly for activation.
- Release and check the result.
This tool is a great choice for those who want to improve their nail driving methodswithout compromising speed or quality.
Pneumatic Nail Set
The Pneumatic Nail Setrepresents advanced technology in nail setting tools. Powered by compressed air, this tool is often used in professional woodworking settings. It’s ideal for projects requiring high efficiency and minimal manual effort.
- High Efficiency:Suitable for large-scale projects.
- Minimal Effort:Reduces physical strain.
- Professional Use:Common in industry settings.
When exploring tools for carpentry, the Pneumatic Nail Set stands out for its power and speed. Attach the tool to an air compressor and position it over the nail. With a quick trigger action, nails are set firmly and quickly.
| Advantages | Disadvantages |
|---|---|
| Fast operation | Requires air compressor |
| High precision | Higher cost |
This nail set type is perfect for those who frequently engage in woodworking toolsand seek efficiency in their nail set types.
Choosing The Right Nail Set
Choosing the right nail set is crucial for achieving professional-looking results in your woodworking or home improvement projects. A tool nail set helps you drive nail heads below the surface without damaging the surrounding area. Selecting the best one involves considering several factors like material, size, and grip. Each aspect plays a vital role in the efficiency and comfort of your tool. Let’s delve deeper into these considerations to help you make an informed choice.
Material Considerations
The material of the nail set affects its durability and performance. High-quality materials ensure that the tool lasts longer and performs better.
- Steel:Steel is a popular choice due to its strength and durability. It withstands impact and resists bending.
- Brass:Brass is softer than steel, making it less likely to damage delicate surfaces. It’s ideal for projects involving softwoods.
- Alloy:Alloy combines different metals to enhance strength and resistance. It offers a balance between durability and weight.
Consider the material based on your project’s needs. For heavy-duty work, a steel nail set might be the best option. If working on softer materials, brass could be more suitable. Always check the manufacturer’s specifications to ensure the tool meets your requirements.
Size And Length
The size and length of a nail set determine its usability for different tasks. Choosing the right dimensions ensures precision and ease of use.
Here’s a simple guide:
| Size | Use Case |
|---|---|
| Small (1/32 inch) | Finishing nails and small brads |
| Medium (2/32 inch) | General woodworking tasks |
| Large (3/32 inch) | Framing and larger nails |
Choose a nail set that matches the size of the nails you frequently use. A set with multiple sizes can be a versatile addition to your toolkit. Ensure the tool’s length allows for comfortable handling without compromising precision.
Grip And Comfort
A comfortable grip enhances control and reduces fatigue during prolonged use. It’s essential for precise work and safety.
- Handle Material:Look for handles made of rubber or plastic. These materials provide a non-slip grip.
- Ergonomic Design:An ergonomic design fits naturally in your hand. It minimizes strain and allows for better control.
- Weight Balance:A well-balanced tool feels stable and easy to maneuver. It prevents hand fatigue during extended use.
Try holding the nail set before purchasing. Ensure it feels comfortable and secure. A good grip helps you work efficiently without slipping or losing control. Opt for a design that suits your hand size and grip preference.
Essential Tools For Using A Nail Set
Using a nail set can enhance the finish of your carpentry projects. This tool allows nails to be driven below the surface of wood, creating a smooth finish for painting or varnishing. To do this effectively, having the right tools is crucial. Below, we explore the essential tools needed for using a nail set efficiently.
Hammer Selection
Choosing the right hammer is vital for using a nail set. A hammer that’s too heavy or too light can affect your control and accuracy. Here are some tips for selecting the perfect hammer:
- Weight:A hammer weighing between 16 to 20 ounces is ideal for most tasks.
- Handle:Look for a comfortable grip. This prevents slipping and reduces fatigue.
- Material:Steel hammers are durable, but fiberglass or wooden handles absorb shock better.
- Claw Type:A curved claw is versatile, while a straight claw is good for demolition.
Below is a simple table comparing hammer types:
| Hammer Type | Pros | Cons |
|---|---|---|
| Steel | Durable, powerful | Heavier, more vibration |
| Fiberglass | Shock absorbent, lighter | Less durable |
| Wooden | Comfortable grip, absorbent | Can break under high stress |
Safety Gear
Ensuring safety is essential while using a nail set. Proper gear protects you from potential hazards. Here are some necessary safety items:
- Safety Glasses:Protects your eyes from flying debris. Choose shatterproof lenses.
- Work Gloves:Prevents blisters and offers grip. Opt for gloves with reinforced palms.
- Ear Protection:Hammers can be loud. Ear plugs or muffs reduce noise exposure.
- Dust Mask:Useful if working with treated wood or in dusty environments.
Wearing the right safety gear ensures you stay protected during your projects. It’s a simple step that makes a big difference. Remember, safety first!
Step-by-step Guide To Using A Nail Set
Using a nail set tool might seem tricky at first, but it’s a straightforward process with the right steps. This guide will walk you through using a nail set tool to ensure your nails are secure and flush. Whether you’re hanging pictures or assembling furniture, following these steps will help you achieve professional-looking results.
Preparing The Surface
Before setting the nail, you must ensure the surface is ready. Proper preparation leads to better results and avoids any potential damage.
- Clean the area:Use a damp cloth to wipe away dust and debris.
- Inspect the surface:Check for any cracks or weak spots that might need reinforcement.
- Mark the spot:Use a pencil to mark where you want to place the nail. This ensures accuracy and helps in aligning other nails if needed.
If you’re working on a wooden surface, consider sanding the area lightly. This provides a smoother finish once the nail is set. For drywall or plaster, ensure that the area is dry and free from moisture.
| Surface Type | Preparation Tip |
|---|---|
| Wood | Light sanding for smoothness |
| Drywall | Ensure dryness to avoid cracks |
| Concrete | Use a drill for pilot holes |
Positioning The Nail
Positioning the nail correctly is crucial for the stability of your project. Follow these steps to ensure it’s done right.
- Select the right nail:Choose a nail appropriate for your surface. Longer nails for wood, shorter for drywall.
- Hold the nail:Grip it between your thumb and forefinger. This offers control and reduces the risk of bending.
- Align the nail:Position the nail perpendicular to the surface. This ensures a straight insertion.
For beginners, using a guide or a piece of cardboard with a pre-drilled hole can help maintain the nail’s position. If you’re working on a hard surface, such as concrete, consider using a pilot hole. This prevents splitting and makes the process smoother.
Setting The Nail
Setting the nail with a nail set tool ensures it sits flush with the surface. Here’s how to do it effectively:
- Start gently:Use a hammer to tap the nail into the surface until it’s almost flush.
- Position the nail set:Place the tip of the nail set on the head of the nail.
- Strike with a hammer:Tap the end of the nail set with a hammer. This drives the nail below the surface.
Be cautious with your strikes. Gentle taps prevent damage to the surface. If the nail isn’t setting properly, check its alignment. Sometimes, adjusting the angle slightly can make a big difference.
Finishing Touches
Once the nail is set, it’s time for the finishing touches. This not only improves the appearance but also adds to the durability.
- Fill the hole:Use wood filler or putty to fill the indentation left by the nail set.
- Smooth the surface:Sand over the filled area once it’s dry. This ensures a seamless finish.
- Paint or stain:Apply paint or stain to match the surrounding area. This conceals any marks and adds a polished look.
For best results, use a high-quality filler and ensure it’s completely dry before sanding. When painting, apply a primer first. This helps in achieving an even color and enhances durability.
Common Mistakes To Avoid
Using a tool nail set can greatly enhance your DIY projects, ensuring nails are perfectly driven below the surface. Yet, many people stumble upon common mistakes that can hinder the process and results. Let’s explore these common pitfalls and learn how to avoid them for a smooth, efficient experience.
Incorrect Hammering Technique
One of the most frequent errors is using the wrong hammering technique. Proper hammering is crucial for effective nail setting. Here are some points to consider:
- Hold the hammer correctly: Grip it firmly, but not too tight. Your wrist should be flexible.
- Use the right amount of force: Too much force can bend the nail; too little won’t drive it.
- Strike at the correct angle: Keep the hammerhead aligned with the nail head.
Proper hammering involves more than just strength. It’s about control and precision. A table below highlights the do’s and don’ts:
| Do’s | Don’ts |
|---|---|
| Use controlled swings | Hit with brute force |
| Align hammerhead with nail | Swing at an angle |
| Grip the hammer firmly | Hold it too loosely or tightly |
Using The Wrong Nail Set
Choosing the correct nail set is vital for a successful task. Often, people make the mistake of picking the wrong size or type. Here’s how to avoid this:
- Identify the nail size: Match the nail set size to the nail head.
- Consider the material: Different materials may require different nail set types.
- Check the set’s condition: Ensure it’s not worn out or damaged.
Using an incorrect nail set can lead to uneven surfaces or even damage to the material. This simple oversight can cause frustration and waste time. Always double-check your tools before starting.
Neglecting Safety Precautions
Safety should never be an afterthought. Ignoring safety measures can lead to accidents. Here are some essential safety tips:
- Wear safety goggles: Protect your eyes from flying debris.
- Use gloves: They provide a better grip and protect your hands.
- Keep work area clean: A cluttered space increases accident risks.
Neglecting these precautions can result in injuries. Remember, safety gear is as crucial as the tools you use. Make it a habit to check your surroundings and gear before every project.
Maintenance Of Nail Sets
Maintaining your nail set tools is crucial for their longevity and performance. Proper care keeps them sharp and ensures precision in your projects. Regular maintenance also prevents rust and damage, which can compromise the quality of your work. Let’s explore some easy steps to keep your nail set tools in excellent condition.
Cleaning Tips
Regular cleaning helps extend the life of your nail set tools. Dirt and debris can accumulate, affecting their efficiency. Follow these tips to keep them clean:
- Use a Soft Cloth:Wipe the tools with a dry or slightly damp cloth after each use. This removes dust and small particles.
- Warm Soapy Water:For deeper cleaning, immerse the tools in warm soapy water. Gently scrub with a soft brush.
- Dry Thoroughly:Ensure all moisture is removed to prevent rust. Use a clean, dry towel to pat them dry.
- Oil Application:Apply a small amount of machine oil to prevent rust. This is especially important for metal tools.
For more persistent grime, consider using specialized tool cleaners. These can effectively remove tough residues without damaging the tools. Regular cleaning not only maintains the tools but also keeps your work area tidy.
Storage Recommendations
Proper storage is key to preserving the condition of your nail set tools. Here are some recommendations:
- Toolbox with Compartments:Use a toolbox with separate compartments. This prevents tools from clashing and getting damaged.
- Dry Environment:Store tools in a dry place. Moisture can lead to rust and weaken the metal.
- Temperature Control:Avoid extreme temperatures. High heat can warp tools, while cold can make them brittle.
Consider investing in a storage solution that suits your workspace. A simple table can help you compare options:
| Storage Option | Pros | Cons |
|---|---|---|
| Toolbox | Keeps tools organized | Can be bulky |
| Wall Rack | Easy access | Requires wall space |
Keeping your nail set tools organized and stored properly ensures they are ready for your next project. It also minimizes wear and tear, saving you money on replacements.
Credit: sawdustgirl.com
Applications Of Nail Sets
Nail sets are handy tools that help drive nails into surfaces without damaging them. Their applications extend across various fields, ensuring precision and a clean finish. Knowing how to use a nail set can elevate your projects and repair tasks. Let’s explore the diverse applications of nail sets in woodworking, home repairs, and crafting.
Woodworking Projects
In woodworking, nail sets play a crucial role. They ensure nails are flush with the wood, creating a smooth surface. This is vital for projects like furniture making and cabinetry.
- Furniture Making:Achieve a seamless finish by setting nails below the surface. This allows for easy sanding and painting.
- Cabinetry:Precision is key. Nail sets help in securing nails without leaving marks.
Woodworkers often use nail sets for tasks requiring attention to detail. Consider a table showcasing common woodworking applications:
| Application | Benefit |
|---|---|
| Furniture Assembly | Ensures smooth surfaces for sanding |
| Decorative Woodwork | Prevents damage to intricate designs |
Using a nail set avoids splintering, maintaining wood integrity. This makes them indispensable for quality woodworking.
Home Repairs
Nail sets are invaluable for home repairs. They make tasks like fixing loose boards or hanging frames easier. They ensure nails are set correctly, preventing future issues.
- Loose Boards:A nail set helps secure nails deeper into the wood, tightening boards.
- Picture Hanging:Ensures nails are set to avoid shifting or damage to walls.
Consider the benefits of using nail sets for common repairs:
- Prevents surface damage
- Reduces risk of nails popping out
- Improves longevity of repairs
For drywall repairs, nail sets are especially useful. They ensure nails are flush, ready for patching and painting. This tool simplifies repair tasks and enhances the durability of fixes.
Crafting
Nail sets are perfect for crafting projects. They provide precision needed for delicate work. Crafters can use them to assemble small items or create intricate designs.
- Miniature Models:Use nail sets for tiny nails, ensuring a professional finish.
- Decorative Frames:Secure nails without damaging delicate materials.
Crafting requires tools that offer control and accuracy. Nail sets are ideal for:
| Craft | Use |
|---|---|
| Jewelry Making | Setting small nails in intricate designs |
| Art Projects | Ensuring stable assembly without visible nail marks |
Precision is crucial in crafting. Nail sets help achieve it without compromising the material’s quality or appearance. They are essential for any crafting toolkit.
How To Use Nail Art Kit Step By Step?
Creating beautiful nails at home is easier than you might think. With a nail art kit, you can achieve salon-quality results without leaving your house. This guide will walk you through the process step by step. Whether you are learning how to use a nail drill set, applying nail forms, or handling a nail puller tool, this guide will help you use nail tools effectively. Let’s dive in!
How To Use A Nail Drill Set?
Using a nail drill set can seem daunting, but with the right approach, it becomes straightforward. Begin by gathering all the necessary nail art toolsand ensuring your work area is clean.
- Start by selecting the right drill bit. Each bit serves a different purpose, such as smoothing or shaping.
- Adjust the speed of the drill. For beginners, a lower speed is recommended to avoid any mishaps.
- Gently place the drill on your nail. Move it in a smooth, circular motion.
- Focus on removing any ridges or uneven surfaces on the nail.
Remember to clean your drill bits after use to maintain hygiene and prolong their life. Mastering these nail drill techniqueswill give you a flawless finish every time.
How To Use A Nail Form Step By Step?
Applying nail forms is a crucial step in acrylic nail application. It provides a template to sculpt your nails perfectly.
- Prepare your nails:Clean and buff your natural nails.
- Choose the right form:Ensure the form fits snugly under the nail tip.
- Apply the form:Place it under your nail, aligning it with your nail’s shape.
- Secure the form:Pinch the ends to hold it in place.
- Apply acrylic:Use a brush to spread acrylic over the form, shaping it as desired.
- Let it dry:Allow the acrylic to harden before removing the form.
With practice, applying nail formsbecomes second nature, giving you beautifully sculpted nails.
How To Use A Nail Puller Tool?
The nail puller tool is essential in any manicure toolskit. This tool helps remove old nails or stubborn polish.
| Step | Description |
|---|---|
| 1. Position the Tool | Align the tool under the edge of the nail or polish. |
| 2. Apply Gentle Pressure | Press lightly to lift the nail or polish. |
| 3. Lift and Remove | Carefully pull the tool back, lifting the nail or polish. |
Follow this Nail Puller Guideto maintain your nails without causing any damage. Regular practice ensures you master using nail tools effectively.

Credit: www.familyhandyman.com
Frequently Asked Questions
What Is A Tool Nail Set Used For?
A tool nail set is used to drive nails flush with or below a surface. It helps in avoiding hammer marks on wood, ensuring a smooth finish. This tool is essential for woodworking, carpentry, and DIY projects where appearance matters.
How Do You Use A Nail Set Tool?
To use a nail set tool, place it on the nail head and gently tap with a hammer. Ensure the nail is driven just below the surface. This technique prevents damage to the surrounding material and provides a clean, professional finish.
What Size Nail Set Do I Need?
Choose a nail set size based on the nail head diameter. Common sizes range from 1/32 inch to 3/32 inch. Smaller sizes are ideal for finish nails, while larger ones suit bigger nails. Selecting the right size ensures precision and effectiveness.
Can You Use A Nail Set On All Surfaces?
Yes, a nail set can be used on various surfaces like wood, drywall, and trim. However, ensure the material can withstand pressure. Use carefully to avoid surface damage. It’s perfect for delicate tasks that require precision and subtlety.
Conclusion
Using a nail set tool is simple and effective. Practice makes it easier. Keep your tools clean and organized. Safety first—wear goggles to protect your eyes. Choose the right size nail set for each job. Hit gently to avoid damaging surfaces.
Double-check your nails for a smooth finish. Enjoy the satisfaction of a job well done. You’ve learned valuable skills for your next project. Nail set tools can enhance your work quality. Now go and tackle those tasks confidently. Happy DIYing!
Amazon and the Amazon logo are trademarks of Amazon.com, Inc, or its affiliates.