As an Amazon Associate I earn from qualifying purchases.
Are you tired of your nail art chipping away just days after application? You’re not alone.
Many nail art enthusiasts face the same frustration, especially when it comes to those beautifully intricate waterslide nail decals. These decals can transform your nails into mini masterpieces, but without proper sealing, their beauty is short-lived. So, how can you make them last longer?
In this guide, we’ll reveal the secrets to perfectly sealing waterslide nail decals, ensuring your nail art remains vibrant and intact for weeks. Imagine the confidence you’ll feel with long-lasting, stunning nails that look professionally done. Let’s dive into the simple yet effective steps that will keep your nail art looking fresh and fabulous.
Choosing The Right Materials
Selecting suitable materials is key for sealing waterslide nail decals effectively. Opt for a high-quality, quick-drying topcoat. Ensure compatibility with your decals to prevent smudging or fading.
Sealing waterslide nail decals can be a fun and rewarding process, but the key to success lies in choosing the right materials. The right materials ensure your nail art lasts longer and looks more professional. Whether you are a beginner or a seasoned nail artist, knowing what materials to use can make all the difference.
Types Of Waterslide Decals
Waterslide decals come in two main types: clear and white. Clear decals are ideal for light-colored nails, allowing the base color to show through. White decals are best for darker nails, providing a vibrant pop of color that stands out. You might find a variety of designs online or at craft stores, ranging from simple patterns to intricate images. Choose decals that match your style and the occasion. Have you considered creating your own custom decals? With printable waterslide paper, you can design something uniquely yours.
Essential Tools And Supplies
Once you have your decals, gather the essential tools. You will need a small bowl of water, a pair of tweezers, and a pair of scissors. These tools help you easily cut and apply the decals to your nails. A good-quality base coat and top coat are also necessary. The base coat protects your nails and provides a smooth surface for the decals. The top coat seals the design, adding shine and durability. If you’re not sure which brands to choose, look for reviews or ask friends for recommendations. Consider using a nail art brush for precision. It can help you smooth out any bubbles or creases in the decal. Have you ever wondered why some decals don’t stick well? It might be the lack of a good adhesive. A clear nail polish can act as a glue to keep the decal in place before sealing it with a top coat. Finally, don’t forget a small towel or tissue to dry your nails after applying the decals. This prevents smudging and ensures a clean finish. With the right materials and tools, you’re well on your way to creating stunning nail art that lasts.
Credit: www.amazon.com
Preparing Your Nails
For flawless waterslide nail decals, start with nail preparation. This ensures a smooth and lasting finish. Proper preparation helps decals adhere better and look stunning.
Cleaning And Shaping
Begin by cleaning your nails thoroughly. Remove old polish and wash hands with soap. Dry them completely to prevent moisture issues later. Shape your nails using a file. Select a shape that complements your style. Smooth edges for a neat appearance.
Base Coat Application
Apply a base coat to protect your nails. This acts as a barrier, keeping nails safe from stains. It also provides a smooth surface for decals. Choose a base coat that suits your nail type. Let it dry completely before moving to decals.
Applying Waterslide Decals
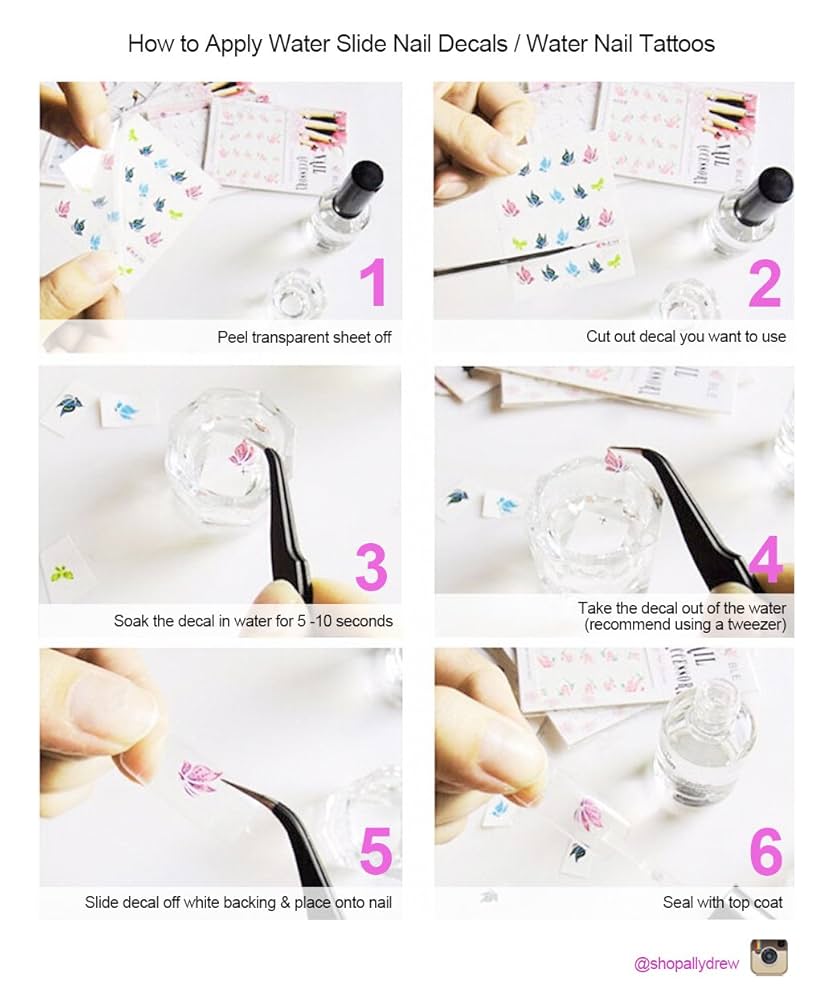
Applying waterslide nail decals can transform your nail art game from simple to stunning. Imagine having intricate designs on your nails without spending hours painting them. Waterslide decals offer a quick and fun way to achieve this. But how exactly do you apply these decals to get the best results? Let’s dive into the process.
Cutting And Soaking Decals
Start by cutting your decals to fit your nail size. Use small scissors for precision. Don’t worry if you’re not perfect; you can trim them later.
Once cut, it’s soaking time. Fill a bowl with water and gently place the decal in. Wait for a few seconds until you see it start to slide off the backing. This step is crucial—be patient and don’t rush it.
Positioning On Nails
Now comes the fun part—positioning the decal on your nail. Use tweezers for better control. Carefully slide the decal onto your nail.
Adjust its position before it dries. This is your chance to get creative. Want it centered or angled? It’s up to you.
Press gently to remove any air bubbles. Think of it like smoothing out a sticker on a notebook. You want it neat and seamless.
Have you ever tried to place decals and ended up with wrinkles? It’s frustrating, right? So, remember to smooth out the decal while it’s still wet. This small step makes a big difference.
Applying waterslide nail decals is like crafting a mini masterpiece on each nail. What’s your favorite design to use? Do you prefer floral patterns or abstract shapes? The choices are endless, and you can change them as often as you like.
By mastering the art of applying decals, you can enjoy salon-quality nails at home. So why not give it a try and add a splash of creativity to your nail routine?
Sealing Techniques
Waterslide nail decals offer a fun way to personalize nails. But how do you make them last? Sealing the decals properly can prevent peeling and fading. Let’s explore effective techniques to seal these stylish decorations.
Using Top Coat
A top coat is a popular choice for sealing waterslide nail decals. Apply a thin layer over the decal to protect it. Wait for the decal to dry before adding the top coat. This avoids smudging. Choose a clear top coat for the best results. It keeps the design visible and vibrant. Reapply every few days to maintain shine and protection.
Alternative Sealants
Some prefer using gel polish as an alternative sealant. It offers a thicker protective layer. This method requires a UV lamp to cure. Ensure the decals are dry before applying gel polish. Another option is to use nail glue. Apply a small amount over the decal. Let it dry completely for a strong seal. These alternatives provide different finishes and durability. Consider your preference and tools available.
Troubleshooting Common Issues
Sealing waterslide nail decals requires careful attention to detail. Start with clean nails and apply the decals smoothly. Use a clear top coat to secure them, ensuring longevity and a flawless finish.
Troubleshooting common issues with sealing waterslide nail decals can be the difference between a polished look and a frustrating nail art experience. If you’ve ever applied these decals only to find bubbling or peeling, you’re not alone. Let’s dive into practical solutions that can help you achieve a flawless finish every time.
Avoiding Air Bubbles
Air bubbles are a common nuisance when working with waterslide nail decals. They can disrupt the smooth appearance of your design. To tackle this, ensure your nails are completely dry before applying decals. Use a flat tool, like a silicone brush or a clean finger, to gently press the decal onto the nail surface. This helps in pushing out any trapped air. Remember, patience is key; take your time to smooth out the decal from the center towards the edges. Do you find bubbles persisting? Consider adjusting the amount of water used. A decal that is too wet can trap more air. Aim for a balance where the decal is moist enough to move but not so soaked that it creates air pockets.
Preventing Peeling
Peeling is another frequent complaint, often resulting from improper sealing. A solid topcoat is your best ally. Apply a generous layer of clear topcoat over the decal, ensuring you seal the edges well. Have you noticed that your decals peel after a few days? This might be due to oil build-up on your nails. Before applying decals, clean your nails thoroughly with alcohol or nail polish remover to ensure a clean surface. If peeling continues, evaluate the quality of your topcoat. A quick-dry topcoat might save time but may not offer the durability needed for long-lasting decals. Opt for a topcoat known for its strength and longevity, even if it means a slightly longer drying time. By addressing these common issues, you can enjoy the creative freedom of waterslide nail decals without the hassle of imperfections. What other challenges have you faced with nail decals? Share your experiences and solutions in the comments below!

Credit: shinnails.com
Caring For Sealed Nail Decals
Preserving waterslide nail decals involves sealing them effectively. Apply a thin layer of clear topcoat to protect the decals. Ensure edges are smooth and even for long-lasting wear.
Caring for your sealed waterslide nail decals is an essential step to ensure they remain vibrant and long-lasting. You’ve put in the effort to apply and seal them, but the journey doesn’t stop there. Regular maintenance and gentle removal are key to keeping your nails looking salon-fresh without damaging your natural nails.
Daily Maintenance Tips
Your daily routine plays a vital role in maintaining the longevity of your nail decals. Start by avoiding prolonged exposure to water, which can weaken the seal. Consider wearing gloves while doing dishes or cleaning to protect your decals. Moisturize your hands and nails regularly. Opt for a non-oily hand cream, as oil can lift the edges of your decals. Imagine the disappointment of peeling decals when you’ve got a special event coming up. A little care goes a long way. Inspect your nails frequently. If you notice any lifting, gently press the decal back down and apply a thin layer of clear topcoat to reinforce it. Have you ever wondered why some nails last longer than others? This quick check could be your answer.
Removing Decals Safely
When it’s time to say goodbye to your decals, ensure you remove them safely to protect your natural nails. Avoid peeling or scraping, as this can damage the nail surface. Soak a cotton pad in nail polish remover and place it on your nail. Wrap your finger in foil and wait for about 10-15 minutes. This method allows the remover to loosen the decal without harsh tugging. After removing the foil, gently slide the decal off with an orangewood stick or your nail. Does it feel like a spa treatment for your nails? This careful removal helps maintain the health of your nails, setting a clean slate for your next nail art adventure. By integrating these maintenance and removal practices, you can enjoy beautiful, long-lasting nail decals without compromising nail health. Your nails deserve the best care, and these simple steps ensure they get it.
Credit: wrapables.com
Frequently Asked Questions
How To Apply Waterslide Nail Decals?
Begin by trimming the decal to fit your nail size. Soak it in water for 30 seconds, then slide it onto the nail. Gently smooth it out, ensuring no air bubbles. Let it dry completely before sealing for lasting wear.
What Sealant Is Best For Nail Decals?
A clear top coat is the ideal sealant for nail decals. It provides a glossy finish and protects against wear. Ensure the top coat is compatible with your decal to prevent damage.
Can Waterslide Decals Be Used On Gel Nails?
Yes, waterslide decals can be applied on gel nails. Make sure your gel surface is clean and dry. Seal them with a gel top coat for durability and shine.
How Long Do Sealed Decals Last?
Sealed decals typically last up to two weeks. Their longevity depends on the sealant quality and application precision. Regular top coat applications can extend their lifespan.
Conclusion
Sealing waterslide nail decals is simple with the right steps. Start with clean nails and ensure decals are dry. Apply a clear topcoat gently. This keeps your design intact and shiny. Regular maintenance helps nails look fresh. Avoid harsh chemicals that may damage the seal.
Practice makes perfect, so keep trying. With patience, you’ll have beautiful nails every time. Enjoy your creative nail art journey!
Amazon and the Amazon logo are trademarks of Amazon.com, Inc, or its affiliates.